PyCharm is an IDE developed by JetBrains for Python. As an IDE, its goal is to provide the programmer with a set of features that make code development in this language more efficient. For example, it automatically writes import lines in a script, points out disparity between expected arguments and those provided in methods, and highlights violations of the Python programming standard (PEP 8).
One feature that is easy to use and helps to reduce the time spent on a task is templates. PyCharm provides us with two types: file templates and live templates. In this post, we will deal with live templates, how they work and how to build our own templates.
Live Templates in PyCharm
Live templates are pieces of code that PyCharm writes automatically for us. Within PyCharm itself, there is already a set of them created and, to use them, just type in a script part of the name of the template you want to use (or press ctrl + j to show a list of all the templates available for the context you are in) and press enter on the desired template.
For example, suppose we have a list of integers defined in our script and we want to do a list comprehension with the elements of that list to select those that are less than 5. PyCharm has a template called “compli” that gives us all the elements needed to create such a list comprehension:
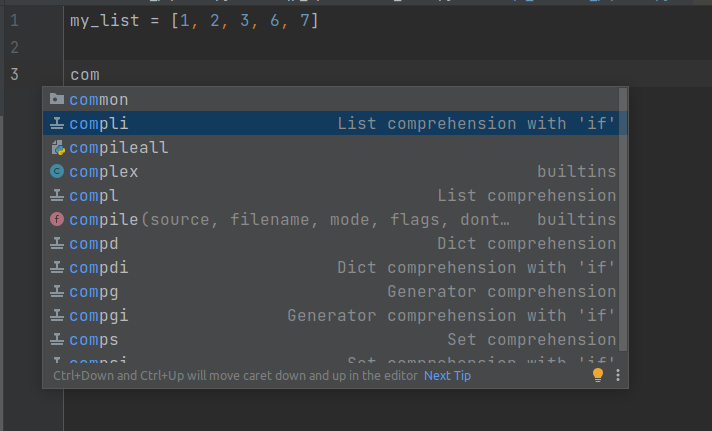
PyCharm denotes the templates with a stamp icon. By selecting the “compli” template and pressing enter, PyCharm will write a list comprehension using the list above as iterable:
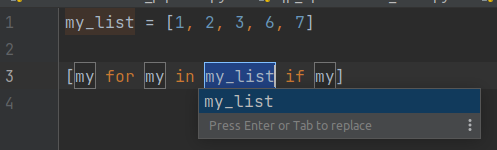
If we press enter or tab on each of the underlined words, we will be able to introduce and modify the list comprehension that PyCharm proposes and arrive at one that seems appropriate to us quickly:

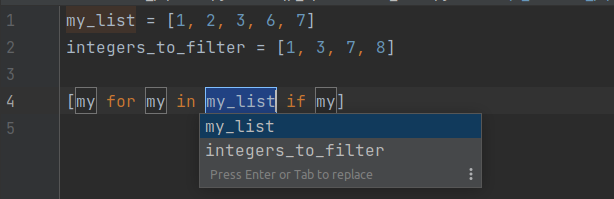
If there is another iterable, PyCharm will place it among the options of the iterable on which we want to do the list comprehension:
“compli” is an example of a parameterized template. The parameters are the words that the system underlines to us and that it allows us to modify. In the documentation, two other types are also detailed: simple template, which when invoked replaces the word with the text we have in the template, and surround template, which places the selected code block between the text specified in the template.
The menu of the templates is located in File > Settings > Editor > Live Templates. In this menu, we can see the description of each template as well as modify and create new ones. In addition, we can create groups of templates so that we can easily deactivate or activate a set of templates.
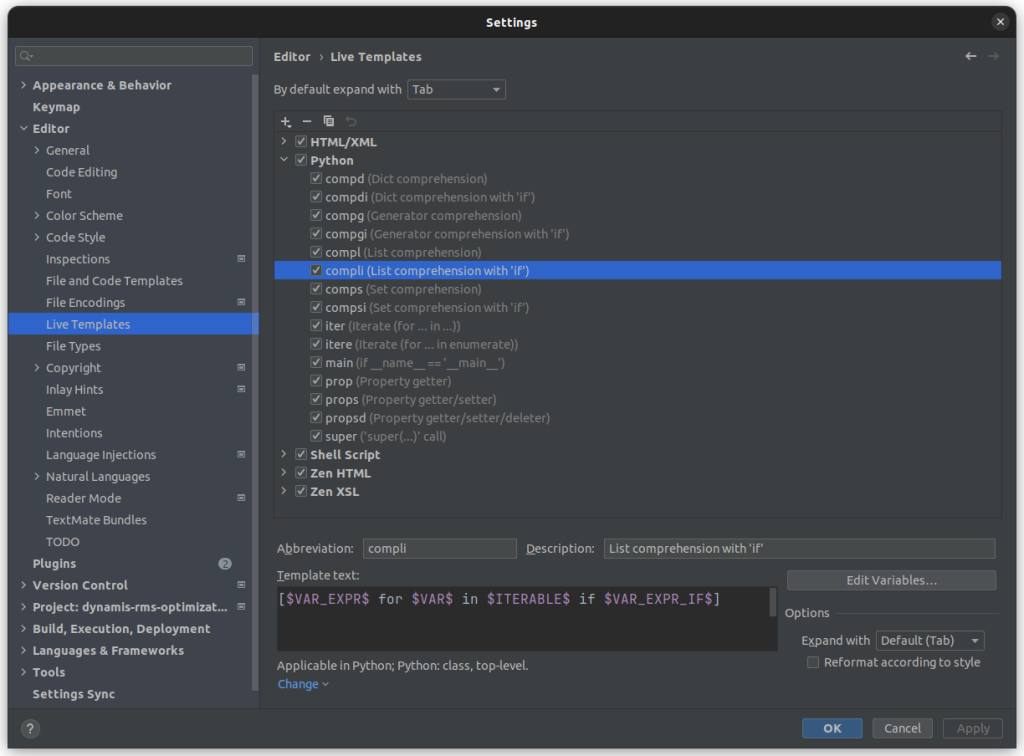
To create a template, just click on the “+” symbol at the top. Abbreviation is the name we will give to our template while in Description we can put a small reference of what it does.
The last thing necessary to be able to use our template is to define in which contexts PyCharm will allow the use of it. For Python we have three: class, top-level and other. If we select class, it will let us use the template only when we are working inside a class, while top-level allows us to use the template inside any Python script as long as we are not working inside a function. Finally, other enables us to use the template inside any function that is not the method of a class.
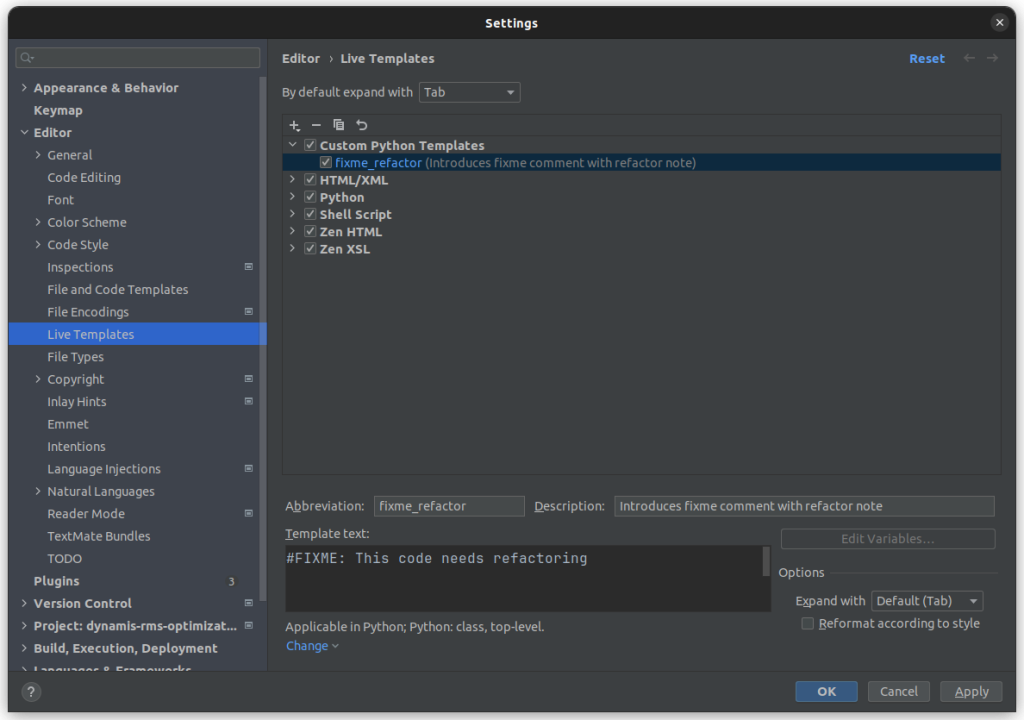
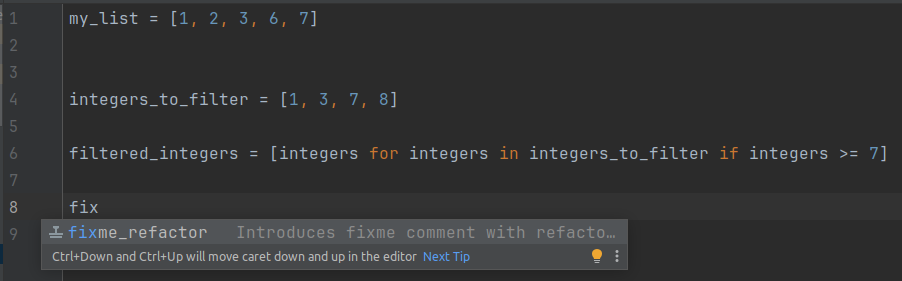
The following images show how we define a simple template that writes a comment and how it is available in the script we were creating:
Parameterized templates
A parameterized template, as indicated above, contains certain words that allow us to modify the template to adapt it to the use we are going to give it. In the template definition, these words are called variables and must be declared in the template text between two “$” symbols.
To exemplify the creation of a parameterized template, let’s imagine that we want to create a generic interface that has an abstract method. To do this, we can place the following code in the text of the template:
import abc

class $className$(abc.ABC):

    @abc.abstractmethod
    def $methodName$(self) -> $returnType$:
        pass
Since we are creating a class, we do not want this template to be available inside another class. We uncheck this option and press “ok”. Now, our template is available for use and we can check it by typing its name in a script:
Modifying the values of the variables in a template
In the previous example, we see that the variables that we declare in the template become marked spaces to be filled in by the user when the template is invoked. However, they also serve to automate tasks if we assign them a value that depends on the context where the template is invoked.
To exemplify this use, let’s think about the problem we have when we make tests. When testing in Python, we usually create a class that inherits from unittest.Testcase, then we create a setup method where we call the constructor of the class we want to test and, finally, a set of methods where we test different functions of the created object:
Most of this code can be automated with a template, if we have as a rule always place the name of the file that contains the tests as test_clase_testeada.py. To make them, we access to the live templates menu as we did before and we place the following text in the template definition:
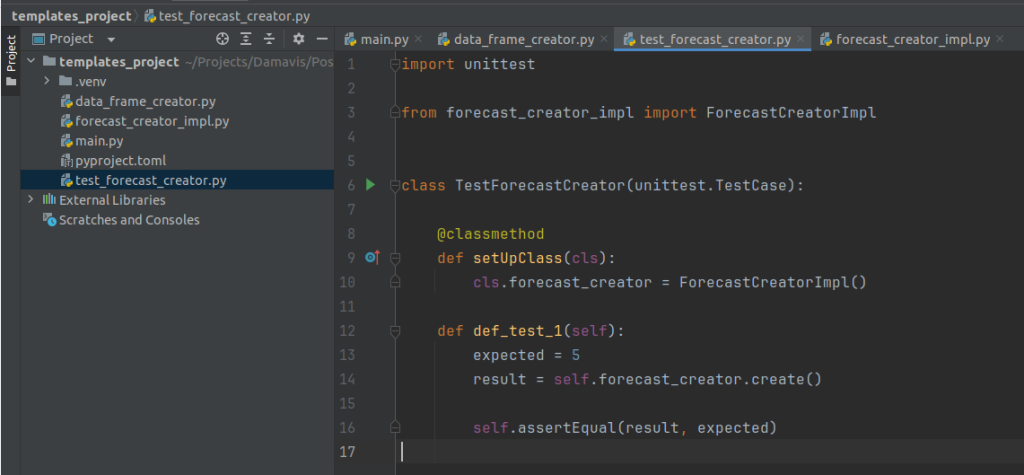
import unittest


class $class_name$(unittest.TestCase):

    @classmethod
    def setUpClass(cls):
        cls.$tested_object$ = $tested_class$Impl()

    def test_1(self):

        expected =

        result = self.$tested_object$.$method_tested$

        $assertion_type$(result, expected)
Now we have to modify the value of these variables so that it is placed automatically. To do this, we will make use of the Edit Variables menu that is located just to the right of where we place the text of the template.
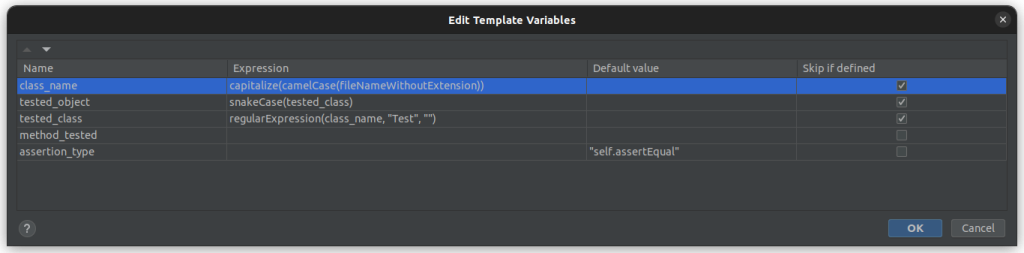
In this box, we will find all the variables that we defined in the text of the template. We can modify the Expression field to place functions that modify the value of the variable, use the Default value field to place a value that the variable will have by default (if the user does not want to modify it) and check Skip if Defined if we want that when the variable already has a value when calling the template it does not appear as an underlined text to be filled, but as normal text.
Returning to our example, we want the variables $class_name$, $tested_object$ and $tested_class$ to have a value and that the user does not need to modify it, so we check Skip if defined in all of them. Now, let’s go to the Expression column. In it, we can make use of the functions predefined by PyCharm to generate the desired behavior in the variable.
For our variable $class_name$, we see that it must be equal to the file name but with a format change and without the extension, so we make use of fileNameWithoutExtension to obtain it. Then, we use camelCase to place it that way and, finally, we place the first letter of the string in uppercase with capitalize.
The variable $tested_class$ can be obtained from the file name, but PyCharm also allows us to reference other variables within the Expression field, so using the regularExpression function on $class_name$ we can easily remove the word “Test” from the string. An important detail is that when we make reference to other variables of the template in the Expression column, we use the name of the same one and we must not place it between two “$” signs.
On the other hand, $tested_object$ is the name we will give in the script to the object whose type is the class we want to test. Thus, if we are testing the ForecastCreator class, we will want an object called forecast_creator. This string can be obtained by applying snakeCase on $tested_class$, which will change from camel case to the desired format.
method_tested$ we want it to be a variable that the user must modify, so we will leave unchecked Skip if defined and we will not place anything else.
Finally, the variable $assertion_type$ we want to be placed by the user but, as in most cases we believe that the equality of two numbers will be tested, we can place a default value self.assertEqual (using the Default value column).
With all this, when calling our template in a script we can see that it has the desired behavior and that in a very short time we can complete the missing details such as the method or the import of the tested class:
Although in our example it was not necessary, the Default value column also allows the use of the functions that we can use in the Expression column, so it is possible to create default values that depend on the context of the template. A list of all the functions available for templates can be found in the documentation on editing Jetbrains template variables.
One function to highlight is groovyScript, which allows to implement any logic we want since it executes a Groovy language script. Apache Groovy is a language implemented on top of Java and connects seamlessly with the libraries developed for this language.
Conclusion
In this post, we have seen the different features of live templates in PyCharm. From the proposed examples, we demonstrated how they can be useful tools to increase productivity by saving us from writing code that follows a pattern.
This is our post for today. If you found it interesting, we encourage you to visit the Software category to see other related articles and to share it in networks with your contacts. See you soon!
