Apache Airflow is an open source tool designed for workflow orchestration especially useful in the field of data engineering. DAGs are defined in Python files and set the relationship and dependencies between the tasks to be executed. You can take a look at this other post where we made an introduction to Basics on Apache Airflow.
This tool allows the user to define when and how these tasks will be executed through the scheduler component, which is responsible for interpreting and launching them when appropriate. In this article, we explore the different options that Airflow provides for scheduling a DAG and that can be separated into two groups: time-based schedules (cron and timetables) and event-based schedules (triggers and datasets).
Note: Since version 3.0 of Airflow, the term Dataset has been renamed to Asset. Although it remains essentially the same, you can check out the post Airflow 3 Scheduling: Timetables, Assets and Event-Driven pipelines for full details.
What is a Scheduler in Airflow?
In Airflow you can define the DAG schedule as a cron expression to launch DAGRuns periodically. This is the simplest way to schedule a DAG. A cron expression is composed of five fields separated by spaces representing, in order, minutes, hours, days of the month, months and days of the week. These five fields describe the time at which the DAG should be launched.
An example might be a process that you want to launch each day at 12:00 noon, that is, launch the DAG when the hour is 12 and the minute is 0. You can pass the expression cron as a string to the schedule parameter in the DAG definition as follows:
dag = DAG(
dag_id='dag_with_cron_schedule',
start_date=datetime(2024, 1, 1),
schedule='00 12 * * *'
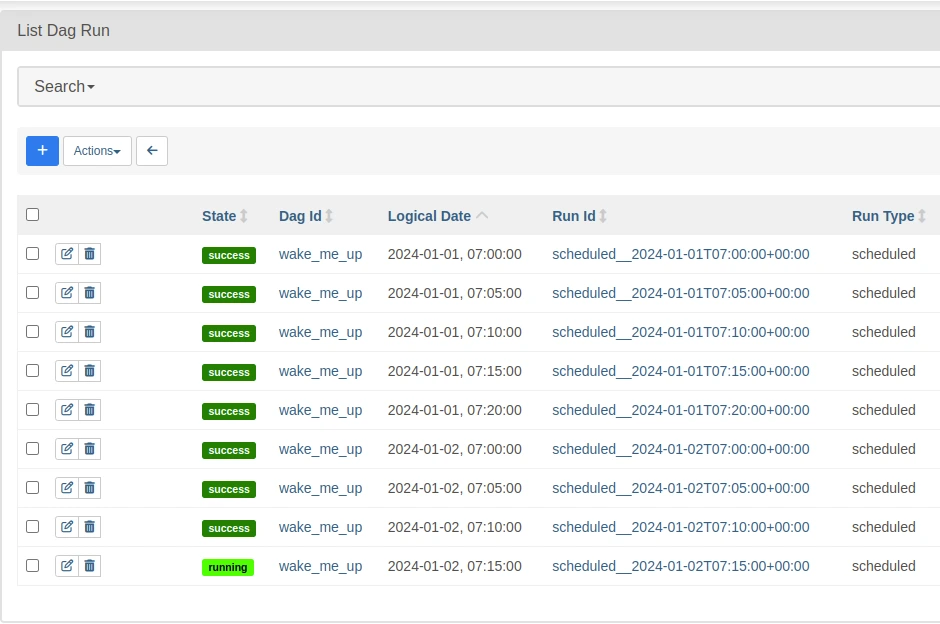
)Cron also provides characters to define for each value (\*), ranges (-), lists (,), etc. This DAG would be launched on weekdays at 7:00 am and repeated every 5 minutes until 7:20 am:
dag = DAG(
	dag_id='wake_me_up',
	start_date=datetime(2024, 1, 1),
	schedule='00-20/5 7 * * 1-5'
)
In the Airflow UI, in the Browse > DAG Runs tab you can see the generated DAGRuns:
Additionally, you can also schedule DAGs with preset cron values. Examples are @hourly, @daily or @weekly. In addition to these, there are some values specific to airflow:
- @continous: a new DAGRuns is created when the previous one finishes.
- @once: only one DAGRun is created.
- None: the scheduler does not create any DAGRun. This option can be used when the DAG is activated externally.
Cron vs Timedelta
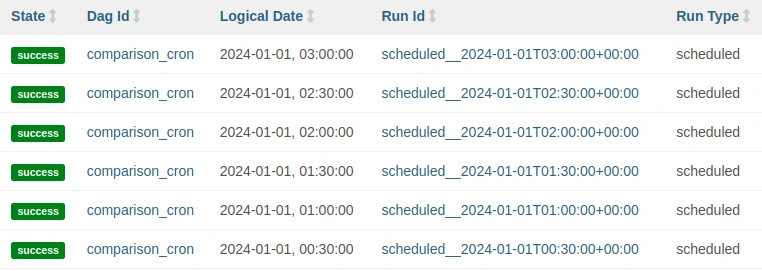
Finally, if you want to run the DAG at fixed intervals, you can also use timedelta objects, from the datetime library. To understand the difference between cron and timedelta, two DAGs with start_date equal to 2024-01-01 00:15 are created and executed every 30 minutes. With cron the expression schedule="*/30 * * * * * *" is used and these are the DAGRuns executed:
With timedelta we use schedule=timedelta(minutes=30) and these are the DAGRuns executed:
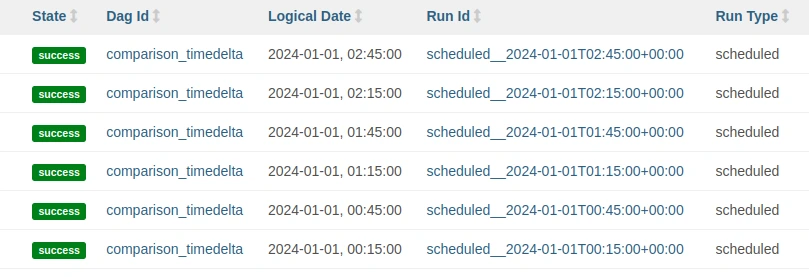
Note that when using timedelta the times of the executions are aligned with the start_date time. This is not the case when using a cron expression.
Timetables: What they are and when to use them
Sometimes, cron and timedelta options will not be sufficient to set the desired schedule of a DAG or their definition in a cron expression would be too complex. In this case, from Airflow 2.2 version onwards, custom schedules can be defined using timetables. Timetables are the basic object with which the scheduler schedules tasks. In fact, when using cron or timedelta expressions, Airflow creates a timetable behind them (CronDataIntervalTimetable and DeltaDataIntervalTimetable, respectively).
Create a custom timetable
To define a custom timetable, you must create a class that inherits from Timetable and implements the methods next_dagrun_info and infer_manual_data_interval. In next_dagrun_info it is established how the interval of the next DAGRun is calculated according to the last DAGRun executed and the parameters start_date, end_date and catchup. In infer_manual_data_interval it is determined how to define the interval in case of manual execution.
For example, to determine that if a run is triggered at 8:46, this is mapped to an interval (for example, the interval from 0:00 to 8:00). If the timetable needs additional parameters for the constructor (__init__), the serialize and deserialize methods must also be adjusted.
In the following example, we want a DAG that runs every 8 hours during weekdays but only runs once a day on the weekend. This can not be represented by a cron expression because on different days it turns at different times. To do this, a custom timetable is created. In this case, the next_dagrun_info and infer_manual_data_interval methods of _DataIntervalTimetable, which is the basis of the CronDataIntervalTimetable and DeltaDataIntervalTimetable described above, have been reused.
from __future__ import annotations

from airflow.plugins_manager import AirflowPlugin

from airflow.timetables.base import DataInterval, TimeRestriction, DagRunInfo
from airflow.timetables.interval import _DataIntervalTimetable
from pendulum import DateTime


class CustomTimetable(_DataIntervalTimetable):
    """Every 8 hours during workdays. Every 24 hours during weekends"""

    WORKDAY_DELTA_HOURS = 8
    WEEKEND_DELTA_HOURS = 24

    def _get_prev(self, current: DateTime) -> DateTime:
        if current.subtract(seconds=1).weekday() >= 5:
            return current.subtract(hours=self.WEEKEND_DELTA_HOURS)
        else:
            return current.subtract(hours=self.WORKDAY_DELTA_HOURS)

    def _get_next(self, current: DateTime) -> DateTime:
        if current.weekday() >= 5:
            return current.add(hours=self.WEEKEND_DELTA_HOURS)
        else:
            return current.add(hours=self.WORKDAY_DELTA_HOURS)

    def _align_to_prev(self, current: DateTime) -> DateTime:
        if current.weekday() >= 5:
            # Align to the start of the current day
            return current.start_of('day')
        else:
            # Align to the last workday_delta_hours interval in the day
            prev_hour = (current.hour // self.WORKDAY_DELTA_HOURS) * self.WORKDAY_DELTA_HOURS
            return current.start_of('day').set(hour=prev_hour)

    def _align_to_next(self, current: DateTime) -> DateTime:
        return self._get_next(self._align_to_prev(current))

    def _skip_to_latest(self, earliest: DateTime | None) -> DateTime:
        current_time = DateTime.utcnow()
        end = self._align_to_prev(current_time)
        start = self._get_prev(end)
        return max(start, self._align_to_next(earliest))

    def infer_manual_data_interval(self, *, run_after: DateTime) -> DataInterval:
        end = self._align_to_prev(run_after)
        start = self._get_prev(end)
        return DataInterval(start=start, end=end)

    def next_dagrun_info(self, *, last_automated_data_interval: DataInterval | None, restriction: TimeRestriction) -> DagRunInfo | None:
        return super().next_dagrun_info(last_automated_data_interval=last_automated_data_interval, restriction=restriction)


class CustomTimetablePlugin(AirflowPlugin):
    name = "custom_timetable_plugin"
    timetables = [CustomTimetable]
In the above code, the _get_prev, _get_next, _align_to_prev, _align_to_next and _skip_to_latest methods, which are used by _DataIntervalTimetable to define next_dagrun_info and infer_manual_data_interval, have been implemented with the logic described above. Specifically, _get_prev and _get_next are used to jump from one DAGRun date to the previous or next one, respectively.
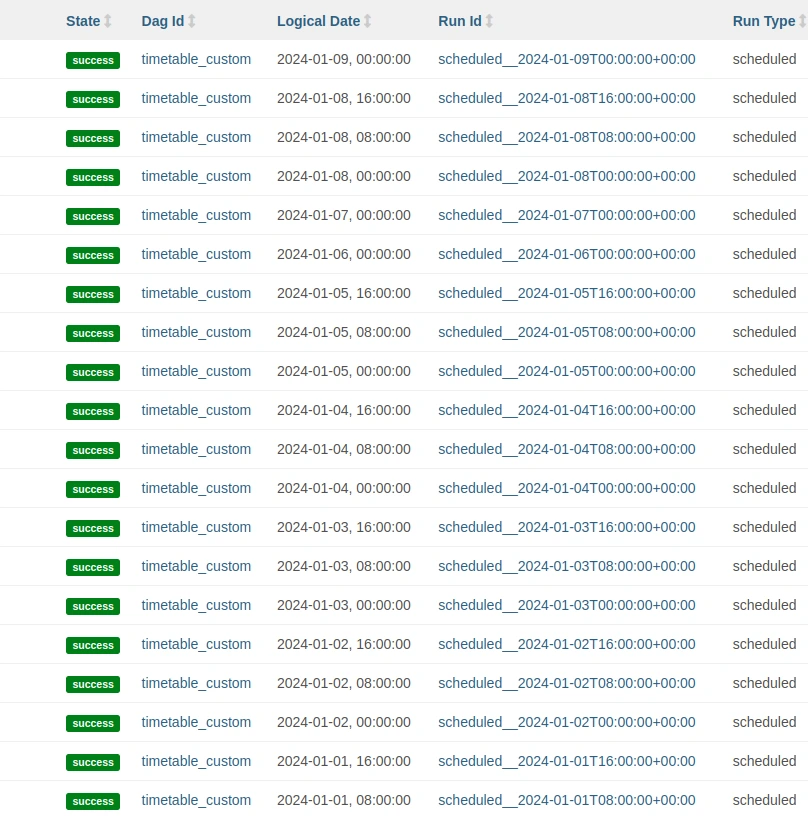
The _align_to_prev and _align_to_next methods are used to jump from any date to one aligned with the schedule. Finally, _skip_to_latest is used to determine the first DAGRun in case the DAG is set to catchup=False. In the following image you can see the DAGRuns created with schedule=CustomTimetable(), being day 6 and day 7 Saturday and Sunday, respectively:
Triggers in Apache Airflow
The cron, timedelta and timetables options allow you to define DAGs that are executed according to moments or time intervals. However, these options do not provide for the possibility of launching DAGs based on events. If one wanted to launch a DAG depending on the state of another DAG, the only possibility given these tools would be to launch a periodic DAG and add a sensor task to it. This may not be optimal if this task waits for a long time or if you want to launch the DAG irregularly.
One of the options to launch the DAG based on events is to trigger that DAG. The simplest way is to access the Airflow UI and hit the play button. This will generate a manual DAGRun. Another way is to use the TriggerDagRunOperator operator to, from another DAG, trigger the desired DAG. This can be useful if there are two processes that update a table and there is a third process that reads from this table.
An example task could be this:
trigger_task = TriggerDagRunOperator(
    task_id='trigger_task',
    trigger_dag_id='dag_triggered',
    dag=dag
)
In this case, the DAG dag_triggered would start executing when this task is finished. DAGs that always want to be executed through triggers can be assigned schedule=None.
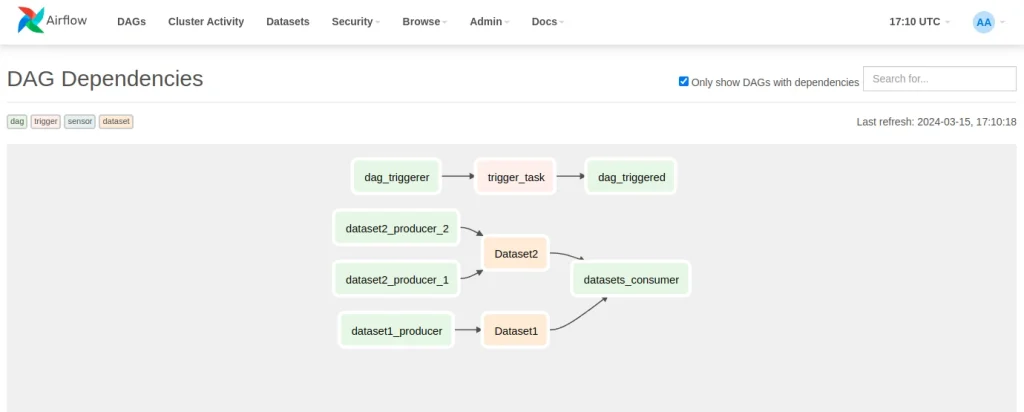
In the UI, under Browse > DAG dependencies you can find a view that shows the relationships between DAGs. Sensors, triggers and datasets are shown, which you can see below.
Datasets: What they are and how they work
In version 2.4, Airflow introduced the concept of datasets. Datasets are another way of executing DAGs based on events that is much more flexible than triggers, since any task can produce datasets and the DAG can be configured to require more than one condition to execute.
The way datasets work is very simple: there are tasks that produce datasets through the outlets=[my_datasets] parameter and DAGs that consume datasets through the schedule=[my_datasets] parameter. A dataset is defined as a URI (e.g., Dataset("s3://dataset-bucket/example.csv")). Conceptually, the producing tasks modify this csv and the consuming DAG has to run because the data has been changed. However, Airflow does not read any file. On a practical level, a dataset is simply a string that identifies the object.
Example of a producer task:
dag = DAG(
    dag_id='dataset1_producer_1',
    start_date=datetime(2024, 1, 1),
    schedule='00 * * * *'
)

task_1 = PythonOperator(
    task_id="task_1",
    dag=dag,
    python_callable=lambda: time.sleep(5),
    outlets=[Dataset('Dataset1')]
)
Example of consumer DAG:
dag = DAG(
dag_id='datasets_consumer',
start_date=datetime(2024, 1, 1),
schedule=[Dataset('Dataset1'), Dataset('Dataset2')]
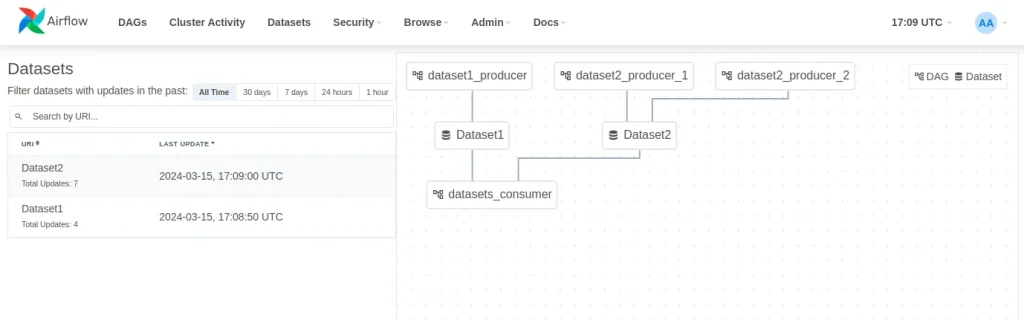
)When a DAG depends on multiple datasets, it will be executed when all datasets have been updated at least once since the last time the DAG was executed. At the top of the UI, Airflow provides a dataset view in order to visualize the relationships between datasets and DAGs. In this example, there is a producer of Dataset1, two producers of Dataset2 and a consumer that reads from the two datasets:
Conclusion
In this article, we have detailed the different ways in which DAGs can be deployed in Airflow. On the other hand, we have analyzed certain options that exist to launch the DAG according to moments or time intervals (cron and timetables) and others that allow launching the DAG based on events (triggers and datasets).
Visit our Damavis Github to access all the examples we have seen in this post.
That’s it! If you found this article interesting, we encourage you to visit the Airflow tag with all related posts and to share it on social media. See you soon!
