
Human pose detection is a quite relevant task in the field of computer vision, which consists of identifying the pose of a human figure from an image. This pose is defined from a series of key points, usually joints, so that the objective is to find the position (x, y) of each of these points, or (x, y, z) in case we want to identify also the depth. Depending on the option chosen, we will talk about 2D or 3D pose detection.
In this article, we will try to give an overview of the subject, as well as expand in depth the operation of a quite complete architecture, BlazePose. We will also perform some use cases, where we will be able to see the potential of this type of models.
General ideas
In [1] a taxonomy is proposed that reflects quite well the most common approaches to the problem. On the one hand, we can make a distinction between estimating the pose of a single person whose position is known and estimating the pose in an image with multiple people with unknown positions. In the first case, we know that we have to identify the n key points that represent the pose, while in the second case, we know neither the positions of the persons, nor the number of them, and therefore neither the number of key points in the image.
In the context of multi-person estimation, we can find two main lines:
- Top-down Approach: First we detect the persons appearing in the image, obtaining the box of each one (segment of the image containing the person), and then we apply some technique to obtain the key points for each person identified.
- Bottom-up Approach: We locate all the key points of the image at first and then we group them to form persons.
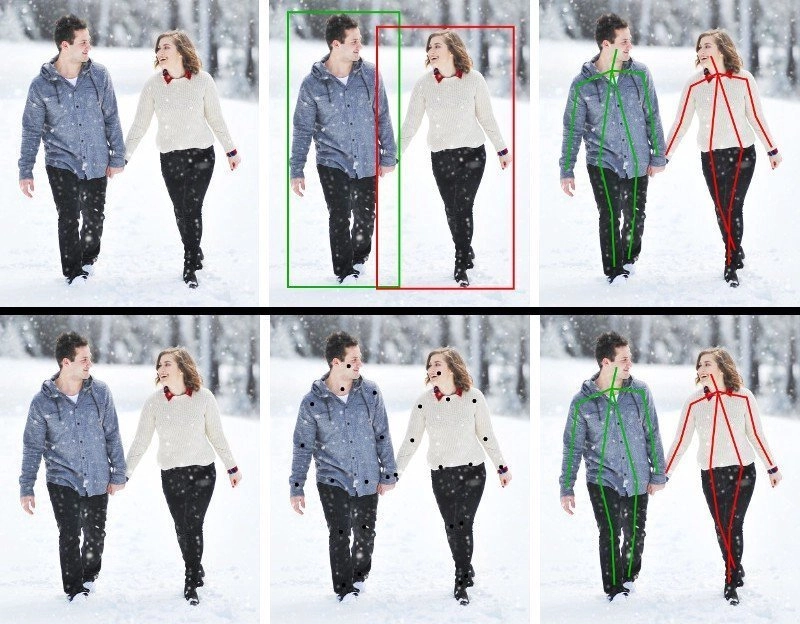
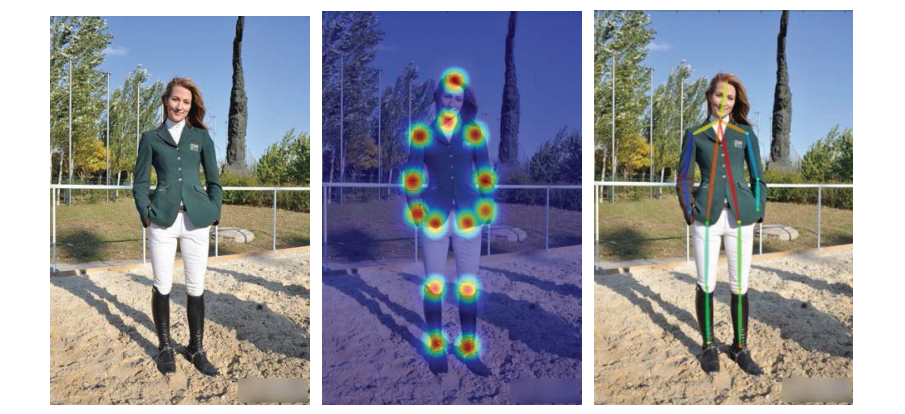
There are two main approaches to obtain the position of the key points: heat maps and direct regression. Heat maps are usually generated with a two-dimensional Gaussian distribution centered on the key point, while direct regression seeks to directly obtain the position of the point in each of the dimensions [2].
BlazePose
In this post we will work with BlazePose [3], an architecture for 3D single-person pose detection based on convolutional neural networks, through the implementation available in the MediaPipe framework. It is a model that uses both heat maps and direct regression and, in addition to having a high accuracy, it is able to perform real-time inference on a mobile device, being this very significant if we consider that this type of models are usually heavy and quite slow.
Person detection
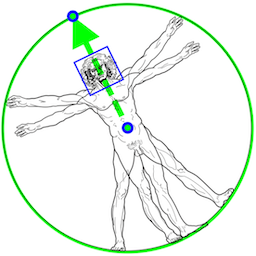
The first step is to identify the region of the image in which the person is located, for which a face-based position detector is used. The authors start from the premise that this part of the body is an easy and inexpensive way to identify a person. This detector, in addition to identifying the face, gives us information such as the center point of the hip, the circumference around the person and the angle of the trunk of the body at the same.
If we are working on a video, it will not be necessary to perform this detection in each frame, but we can use it in the first frame and then use the pose detected in the previous frame. In this way, the inference pipeline follows the scheme shown in Figure 4. However, if at any time the position is lost, the detector will be executed again on the next frame.

Key points
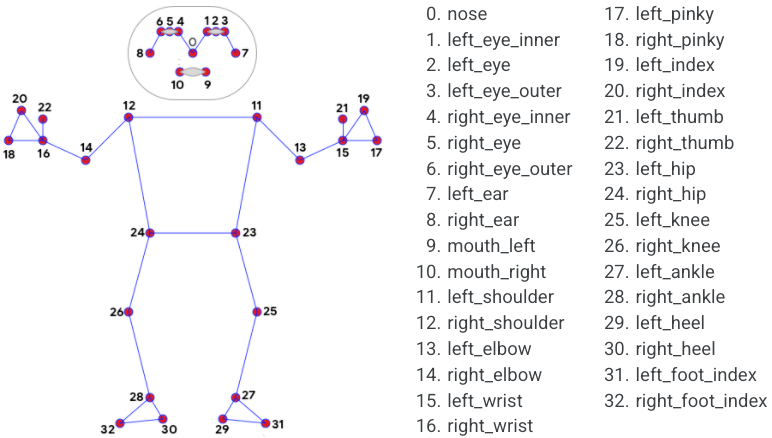
There are multiple representations of the human pose using different combinations of key points, but, in particular, BlazePose uses a selection of 33 points. In Figure 5 we can see these points and their respective equivalence.
Neural network architecture
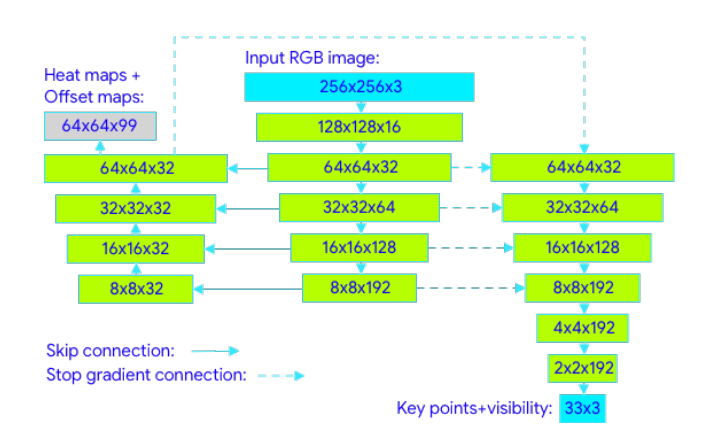
The network receives as input an RGB image of the segment containing the person, resized to 256×256 and rotated so that the angle is 90 degrees to the x-axis. The information passes through a series of convolutional layers where higher level features are extracted. Note that the connections between columns represent Skip Connections (shortcuts), which allow a balance to be achieved between features at different levels.
On the one hand, the center and left columns form a U-shaped encoder-decoder architecture to generate heat and offset maps, widely used for image segmentation tasks. In the U, the center column is constructed with convolutional layers, while the left column recovers the original dimensions using transposed convolutions [4]. The heat map and the offset are only used for training, serving to train the embedding that will later be used for regression.
On the other hand, the regressor follows an encoder architecture, where after convolutional layers with Skip Connections and a couple of conventional layers to perform the regression, the 33 points (x, y, z) are obtained. As can be seen in the figure, the right column receives connections with gradient off, that is, it receives the information but does not backpropagate the error.
Experimentation
First, we will import the necessary libraries: OpenCV (cv2) to work with images, mediapipe for the model and matplotlib to display the results graphically.
import cv2
import mediapipe as mp
import matplotlib.pyplot as plt
We initialize the model and some tools for the subsequent drawing of the results. In the static_image_mode parameter we are establishing that all the inferences are going to be made statically, so the specific dynamics for video in which the results of the previous frame are used to avoid having to detect the position of the person again is not applied.
On the other hand, min_detection_confidence sets the minimum degree of confidence [0,1] to consider a detection valid. Finally, model_complexity determines the version of the model to build. Specifically, there are 3 versions, 0, 1 and 2, from smaller to larger. The heavier versions will have higher accuracy but also more latency, so they will not always be the best choice.
pose = mp.solutions.pose.Pose(static_image_mode=True,
                              min_detection_confidence=0.3,
                              model_complexity=2)

mp_drawing = mp.solutions.drawing_utils

mp_drawing_styles = mp.solutions.drawing_styles
Now we define the function that we will use to display the detection results.
def drawPose(img, results,title="Detected Pose"):
 img_copy = img.copy()

 if results.pose_landmarks:

   style=mp_drawing_styles.get_default_pose_landmarks_style()
   mp_drawing.draw_landmarks(
                   image=img_copy,
                   landmark_list=results.pose_landmarks,
                   landmark_drawing_spec=style,
                   connections=mp.solutions.pose.POSE_CONNECTIONS)

   fig = plt.figure(figsize = [10, 10])
   plt.title(title)
   plt.axis('off')
   plt.imshow(img_copy[:,:,::-1])
   plt.show()
To apply the pose detection we will only have to load the image and pass it to the process method of the model. This will return the information of the detected points following the coding developed previously. If we use the drawPose function defined above, we obtain the points superimposed on the original image.
img1 = cv2.imread('forrest.png')
results1 = pose.process(cv2.cvtColor(img1, cv2.COLOR_BGR2RGB))
drawPose(img1,results1,"Forrest Gump Pose")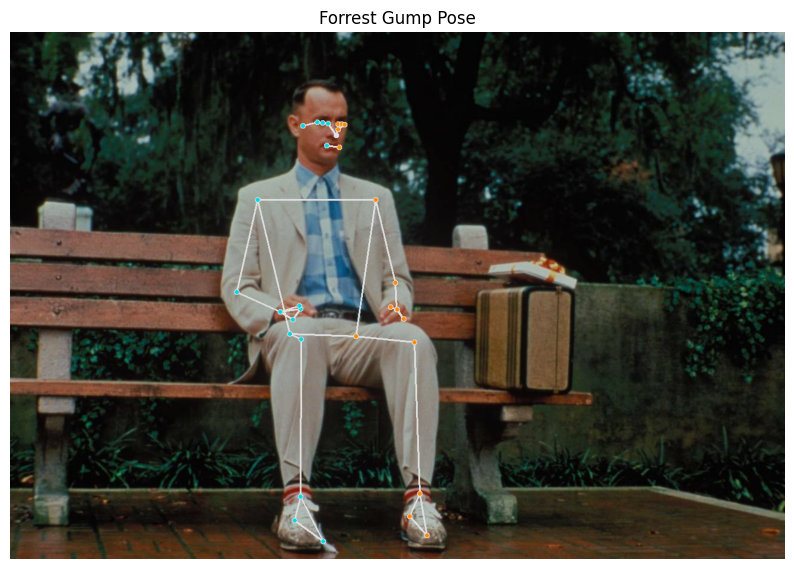
We observed excellent results, let’s now try another image.
mg2 = cv2.imread('jedi.jpg')
results2 = pose.process(cv2.cvtColor(img2, cv2.COLOR_BGR2RGB))

drawPose(img2, results2,"Jedi Pose")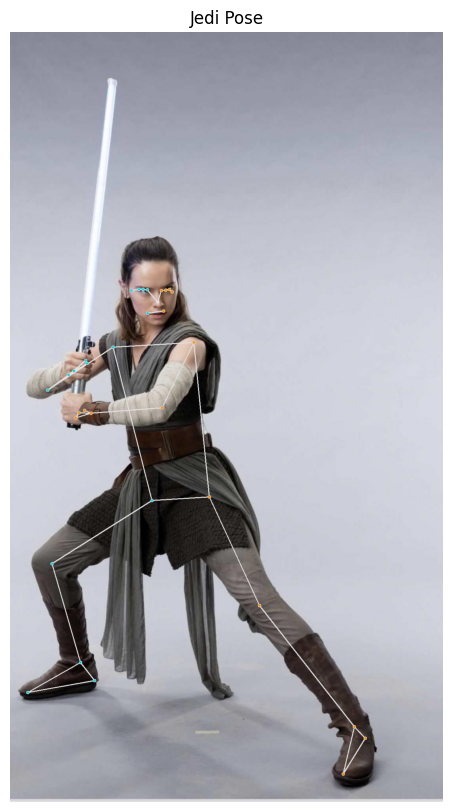
Although there are some slight mistakes in the points of the hands, in general we again obtain good results. Let’s show now the detected pose in 3 dimensions. Note that since the axis is rotated to better see the depth, it is possible that the pose looks different, but this is due to the angle.

This graph makes it clear that the depth inference is being made correctly, for example in the position of the legs.
Conclusion
In this post we have introduced the field of pose detection and we have seen how we can solve problems of this type easily through the implementation available in mediapipe.
In future posts, we will see how we can classify a pose once it has been detected, that is, given a set of key points that make up a pose, assign a class to that pose, such as yoga poses or sitting or standing.
If you are still hungry for more neural networks, you can continue with some of the posts available in our Blog:
- Simple perceptron: Mathematical definition and properties
- Simple Perceptron: Python implementation
- Creating a convolutional network with Tensorflow
- Convolutional Neural Networks applied to the game Hungry Geese
Bibliography
[1] Ce Zheng, Wenhan Wu, Taojiannan Yang, Sijie Zhu, Chen Chen, Ruixu Liu, Ju Shen, Nasser Kehtarnavaz and Mubarak Shah. “Deep Learning-Based Human Pose Estimation: A Survey”. 2020.
[2] Yanjie Li, Sen Yang, Shoukui Zhang, Zhicheng Wang, Wankou Yang, Shu-Tao Xia, and Erjin Zhou. “Is 2D Heatmap Representation Even Necessary for Human Pose Estimation?” 2021.
[3] Valentin Bazarevsky, Ivan Grishchenko, Karthik Raveendran, Tyler Zhu, Fan Zhang and Matthias Grundmann. “BlazePose: On-device Real-time Body Pose tracking”. 2020.
[4] Alejandro Newell, Kaiyu Yang, and Jia Deng. “Stacked Hourglass Networks for Human Pose Estimation”. 2016.
If you found this article interesting, we encourage you to visit the Data Science category to see other posts similar to this one and to share it on social networks. See you soon!
