
Sometimes it might be a bit overwhelming to understand the role of the most common open source technologies used in big data contexts.
For example, probably most of you have heard about tools such as Apache Hadoop, Apache Spark, Apache Hive, Apache Sqoop and so on. But how do you know when to use one or the other? Does one tool depend on another one?
Well, in most cases the answer is yes. With a post series written by Damavis about the Hadoop Ecosystem, we will try to make everything more clear to you, not only by providing theoretical definitions but also getting our hands dirty by configuring and running the tools explained.
To introduce you to the big data ecosystem we have to start from the bottom. What is the base tool in big data? Of course, the base tool is Apache Hadoop.
What is Apache Hadoop?
Apache Hadoop is an open source framework used to store and process big data in a distributed and fault tolerant way. There are several modules that compose Apache Hadoop. The ones we want to highlight are:
- Hadoop Distributed File System, also known as HDFS, which is the way Hadoop stores data in a distributed and fault tolerant way. How is fault tolerance achieved? Simply by doing replication. Data is copied among the different nodes so in case of node failure, its data can be obtained from its replication in other nodes. Note that this module is about data storage.
- Hadoop MapReduce, which is the module in charge of applying the MapReduce programming model to process data in a distributed way. Therefore, the goal of this module is to perform data processing.
- Apache Yarn, which is the component in charge of managing the jobs and resources of the cluster. This tool answers questions such as, how should a task be distributed across the cluster? Which nodes must be involved in this task? How must the work be redistributed in case of node failure? And so on. Therefore, the goal of this module is to perform cluster management.
Since this post focuses on a single-node configuration, we won’t go into detail about the configuration and use of Apache Yarn. That is because in order to launch an HDFS and perform MapReduce jobs in a single node configuration there is no need to set up a cluster manager such as Apache Yarn.
Do not miss our next post of this series, where we will explain how to use Hadoop with Yarn!
Basic Hadoop configuration
When configuring software services, it is good practice to set up users with limited permissions to follow standard system administrator procedures. Therefore, the first thing we will do is carry out this process.
User creation
Before setting up a user you must choose a location where to place your software distribution in order to give permissions to the corresponding user to be able to operate within such location. You can choose the location which is most suitable to you. In our case we will create a folder at the location /opt/hadoop and create a user called hdoop, which will be the owner of such location. The steps to be performed are:
- First, change to the root user →
sudo su - Then make the folder
/opt/hadoop→mkdir /opt/hadoop - Create the passwordless user
hdoopwhose home will be/opt/hadoop→adduser --home /opt/hadoop --disabled-password hdoop - Make the user
hdoopthe owner of its home folder →chown -R hdoop /opt/hadoop - Finally, change to the user
hdoop→su hdoop - Execute
cdto move to the home of thehdoopuser.
Configuration files
Another system administrator good practice is to copy the configuration files to be changed to a specified directory that can be linked to a Version Control System (VCS). Hence, software updates can be done without losing any configuration due to its independence from the new downloaded software distribution. To follow this good practice, with the hdoop user, create the directory /opt/hadoop/config-files, which is where the configuration files will be moved.
Configuration Set Up
First, let’s download Hadoop, uncompress it and create a symbolic link to a directory where the version is not specified (the latter is simply to ease the Hadoop upgrade in case it is necessary in the future). To get Apache Hadoop, execute the following commands:
wget https://ftp.cixug.es/apache/hadoop/common/hadoop-2.10.1/hadoop-2.10.1.tar.gz
tar -xf hadoop-2.10.1.tar.gz
rm hadoop-2.10.1.tar.gz
ln -s hadoop-2.10.1 hadoop
In order to use Apache Hadoop we need to make sure Java 8 is installed in the machine. Execute java -version to check it. If not, install Java 8 executing the following commands with the root user:
apt update
apt install openjdk-8-jdk -y
In order for Hadoop to run, only one environment variable has to be set, which is JAVA_HOME. This assignment can be done in the file /opt/hadoop/hadoop/etc/hadoop/hadoop-env.sh. As explained in the previous section, whenever a configuration file has to be changed, it is good practice to detach it from the software distribution in order to be able to link it to a VCS. So let’s move this configuration file to /opt/hadoop/config-file and create a symbolic link:
mv hadoop/etc/hadoop/hadoop-env.sh config-files/
ln -s ~/config-files/hadoop-env.sh ~/hadoop/etc/hadoop/hadoop-env.sh
Now you can change the environment variable JAVA_HOME. Its value must be:
export JAVA_HOME=/usr/lib/jvm/java-8-openjdk-amd64Because we are running Hadoop on a single node, there is no need to replicate data across nodes, which is the default behaviour. The configuration file to be changed is /opt/hadoop/hadoop/etc/hadoop/hdfs-site.xml. As before, first let’s move this file to out VCS directory:
mv hadoop/etc/hadoop/hdfs-site.xml config-files/
ln -s ~/config-files/hdfs-site.xml ~/hadoop/etc/hadoop/hdfs-site.xml
To remove replication add the following property to the configuration file
<property>
<name>dfs.replication</name>
<value>1</value>
</property>
Location of HDFS
The next step is to let Hadoop know the location where the HDFS has to be built. Because we are running everything locally, we will build HDFS in localhost.
To make this happen we need to change the configuration file /opt/hadoop/hadoop/etc/hadoop/core-site.xml. Again, first let’s move this file to the VCS directory and create a symbolic link
mv hadoop/etc/hadoop/core-site.xml config-files/
ln -s ~/config-files/core-site.xml ~/hadoop/etc/hadoop/core-site.xml
The property to be added is the following one:
<property>
<name>fs.defaultFS</name>
<value>hdfs://localhost:9000</value>
</property>
Finally, because when building HDFS a connection has to be done to localhost, we need to be able to ssh localhost. To do that, generate new authentication key pairs for ssh without passphrase and copy your public ssh key to the file that contains the authorized ssh keys:
ssh-keygen -t rsa -P '' -f ~/.ssh/id_rsa
cat ~/.ssh/id_rsa.pub >> ~/.ssh/authorized_keys
ssh localhost
Another recommended step is to modify the environment variable PATH to be able to run Hadoop commands from any location. For that, add the following command into your .bashrc in the home directory:
export PATH=/opt/hadoop/hadoop/bin:$PATHRemember to do source .bashrc to apply the change in the current session.
Apache Hadoop is configured!
Test your configuration
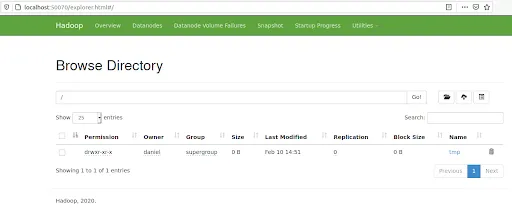
To make sure that everything has been done properly, let’s launch HDFS and copy a file into it.To launch HDFS execute first hdfs namenode -format to launch the NameNode, which is a master server that keeps the directory tree of all files. Then execute the script located at /opt/hadoop/hadoop/sbin/start-dfs.sh. Subsequently, enter in your browser the URI http://localhost:50070 to be able to see the Hadoop UI.
Let’s now create a file called tmp and copy it into our HDFS:
touch tmp
hdfs dfs -copyFromLocal tmp hdfs://
You have two ways to see if the tmp file has been copied to HDFS, either listing files from the command line:
hdfs dfs -ls hdfs://
Or using the UI by clicking on Utilities/Browse the file system:
Next steps
Find the second part of this article in Introduction to Apache YARN where Apache Yarn is used in our Hadoop Ecosystem, which is the right way to use Hadoop.
If you found this post useful, share it with your contacts so that they can also read it and give their opinion. See you in social networks!
