
Basic Single Node Configuration
Note: the code of this post has been tested using Apache Hadoop 2.10.1. Please check out our previous post, Introduction to Apache Hadoop, to configure this version of Hadoop, in case you have not done it yet. On the other hand, this post assumes that you already have a basic Apache YARN configuration running. Please, check out our introductory post Introduction to Apache YARN.
Introduction to Apache YARN
After introducing you to Apache YARN in our post Introduction to Apache YARN, we highlighted that only the surface of this cluster manager had been scratched. So we owe you a more in depth explanation of this tool. Summarizing, we saw that YARN is the manager that determines how MapReduce jobs are executed across the cluster. In the post, only two properties were added to the configuration files to make the most simple configuration work.
The goal in this post is to introduce you to a more advanced configuration setting that will allow you to improve YARN’s performance. But before getting into changing several properties we need a deeper understanding of this tool’s architecture.
Apache YARN Architecture
Let’s be honest… the first time we checked the official Apache Hadoop documentation to read about Apache YARN’s architecture we did not fully understand it. We had to do some additional research to get a better understanding. Furthermore, playing around with the properties that can be changed in the configuration file was very helpful when trying to deepen our understanding about YARN.
We’ll try to convey to you the result of our learning journey in a reasonable way:
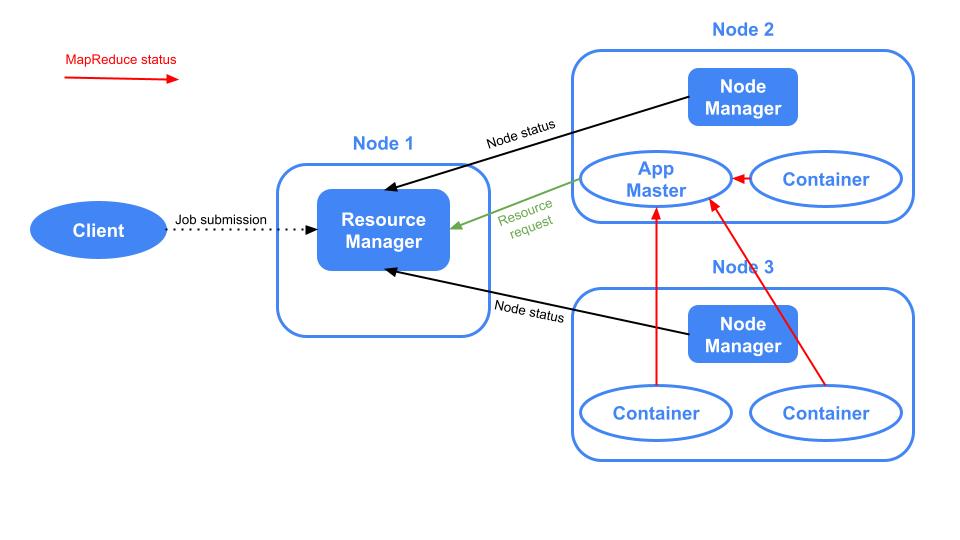
In Apache YARN there are several components. Let’s introduce them in an order that makes sense so you can relate them as we move forward:
- Resource Manager: there is only one per cluster and it is in charge of managing the use of resources across the cluster.
- Node Manager: there is one per cluster node and it is in charge of managing the use of resources across the node. There is a communication between the Node Managers and the Resource Manager given that the latter has to constantly know what are the resources available in the nodes.
- Application: it is the job which is sent from the Client to the Resource Manager.
- Application Master: it is launched by the Resource Manager in one of the nodes and it is in charge of orchestrating the application run and communicating to the Resource Manager in order to do it. This communication occurs in the following way:
- The Application Master asks the Resource Manager for resources to be able to execute the Application.
- The Resource Manager launches Containers in the different nodes by asking these resources to the Node Managers.
- Once the Containers are launched, the Application Master submits the jobs to be executed.
- Finally, the Application Master communicates to the Resource Manager the outcome of the job execution.
- Container: as explained above, it is a small piece of memory and CPU created within a node by the Resource Manager. It is where a part of an Application is executed.
Here there is an image of Apache YARN where the components described above are shown:
Requirements
As explained in the previous post Introduction to Apache YARN, in our case, we have created a folder at the location /opt/hadoop where the hadoop distribution is located and we have created a user called hdoop, which is the owner of such location. With the hdoop user, we created the directory /opt/hadoop/config-files, which is where the configuration files are moved. We assume that you have followed the previous post Introduction to Apache YARN. Hence, you must have the configuration files mapred-site.xml and yarn-site.xml in the folder /opt/hadoop/config-files, with one defined property in each file.
Configuration Customization
Now we are ready to understand the consequences of changing some of the YARN properties that can be customized.
There are so many properties that can be changed and there is no way we can go over all of them in this post. So we chose some of them to introduce you to the customization capabilities that the end user has when dealing with YARN. In order to have access to all the properties that can be customized, please refer to the official Apache YARN documentation
We will go over some properties that can be change in the yarn-site.xml configuration files:
yarn.resourcemanager.hostname: name of the host of the Resource Manager. Default value 0.0.0.0. In our demo the default value is not changed. Note that leaving the default value implies that the service can be accessed by any active network interface of the machine. In production environments, studying whether the default value could be a security issue is a must.yarn.nodemanager.resource.detect-hardware-capabilities: boolean that specifies whether the Node Manager must enable auto-detection of memory and CPU of the node. By default it isfalse. In our demo it is set totrue.yarn.nodemanager.resource.pcores-vcores-multiplier: a number which is multiplied by the physical number of cores, which can be inferred using the previous property yarn.nodemanager.resource.detect-hardware-capabilities, to obtain virtual cores, also know by vcores, which are the CPU units that compose Containers. By default it is 1.0. In our demo it is set to 3.0.yarn.nodemanager.resource.cpu-vcores: specifies the number of virtual CPUs that a Node Manager can use to create containers when the Resource Manager requests container building. By default it is -1. When being -1 andyarn.nodemanager.resource.detect-hardware-capabilitiesistrue, the number of vcores is automatically determined from the hardware. In our demo this property is not changed.yarn.nodemanager.resource.system-reserved-memory-mb: memory in MB that is reserved for the system processed not involving YARN. By default it is -1 which is calculated as 20% of(system memory - 2*HADOOP_HEAPSIZE). In our demo it is set to 2048.yarn.scheduler.minimum-allocation-mb: minimum allocation in MBs for every container request at the Resource Manager. By default it is 1024 MB. In our demo it is set to 512.yarn.scheduler.maximum-allocation-mb: maximum allocation in MBs for every container request at the Resource Manager. By default it is 8192 MB. In our demo it is set to 2048.yarn.scheduler.minimum-allocation-vcores: minimum number of virtual CPU cores that the Resource Manager assigns to each container request made by the Application Master. By default it is 1. Not taken into account if the default scheduler is used. Given that the default scheduler is not changed, this property is not set in our demo.yarn.scheduler.maximum-allocation-vcores: maximum number of virtual CPU cores that the Resource Manager assigns to each container request made by the Application Master. By default it is 4. Not taken into account if the default scheduler is used. Given that the default scheduler is not changed, this property is not set in our demo.
Seeing YARN Properties in Action
Our local machine, which is where we are launching Apache YARN has 6 physical CPUs and 16 GBs of RAM. The properties above have been added to the configuration file yarn-site.xml. Let’s launch Apache YARN by executing:
/opt/hadoop/hadoop/sbin/start-yarn.shExecute a MapReduce job to see Apache YARN in action. For example, let’s create a file in our local machine, copy it into our HDFS and then copy the file from HDFS to another HDFS location using MapReduce (here we assume a local HDFS instance is running):
dd if=/dev/zero of=filename.big bs=1 count=1 seek=1073741823
hdfs dfs -copyFromLocal filename.big hdfs:///
hdfs dfs -mkdir hdfs:///copied
hadoop distcp hdfs:///filename.big hdfs:///copied/
Enter to the browser http://localhost:8088/cluster to see the UI:
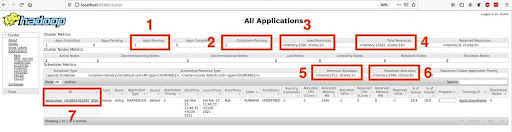
We want to highlight seven different attributes shown in the UI which will allow us to see the consequences of having changed some of the YARN properties:
- Square 1: specifies the number of apps that are being run, which corresponds to the execution of the copy of the file from one location of HDFS to another location of HDFS.
- Square 2: the number of containers running is 2.
- Square 3: used memory and virtual cores. As you can see, two vcores are used, one for each container. As explained in the properties section, even if we had changed the two properties
yarn.scheduler.minimum-allocation-vcoresandyarn.scheduler.minimum-allocation-vcoresthey would not have been taken into account because we are using the default scheduler. On the other hand, 2560 MB of RAM are used, which corresponds to 1024 MB assigned to one container plus 1536 MB assigned to the other container (this cannot be seen in the screenshot but you can easily see it by clicking on the link in box 7 and then on the container IDs), whose values are within the ranges specified in the propertiesyarn.scheduler.minimum-allocation-mbandyarn.scheduler.maximum-allocation-mb. - Square 4: maximum memory and virtual cores that can be used by YARN. Note that the virtual cores are 18, which corresponds to the number of physical cores, which is 6, multiplied by the value from the property
yarn.nodemanager.resource.pcores-vcores-multiplier(we set it to 3). Note that the number of physical cores were properly computed because the value of the propertyyarn.nodemanager.resource.detect-hardware-capabilitieswas set totrue. - Square 5: shows the value we assigned to the properties
yarn.scheduler.minimum-allocation-mbandyarn.scheduler.minimum-allocation-vcores. - Square 6: shows the default values of the properties
yarn.scheduler.maximum-allocation-mbandyarn.scheduler.maximum-allocation-vcores. - Square 7: ID of the application being run. By clicking on it, more details about the execution can be checked.
Conclusion
Once again, there is much more to know about Apache YARN, such as the YARN CLI and the scheduler configuration. This was a brief introduction about how to start customizing this cluster manager. If you found it useful, do not forget to share it with your contacts!
See you in social networks!
