The continuous advances in Artificial Intelligence models have greatly facilitated users’ lives. The evolution of generative AI has opened up a wide range of possibilities and paved the way for developers to the point where they can now have a customized chatbot on their own machine.
In this article, we explore how to build an AI assistant in a local environment from FastAPI, Ollama models and the LlamaIndex library. We will first approach these three technologies from a theoretical point of view and then move on to practice and see how they integrate with a simple example.
FastAPI to serve the chatbot
FastAPI is a framework that helps developers to create websites, services or applications that other apps can use to exchange information. It stands out for its simplicity, being a tool that does not present a very high learning curve and is ideal for large systems due to its scalability.
The operation of FastAPI is simple. It is based on one of the most popular and widespread languages today, Python. Through it, the programmer defines a series of rules (what information can be requested and what is returned) and FastAPI takes care of receiving the inputs, validating the request and sending the corresponding response.
In this way, developers are able to create endpoints that will allow applications to perform this data exchange.
Ollama: Local AI models
Ollama is an open source tool that allows us to have our own LLM on the computer without the need of an internet connection. Once we install it in our local environment and download a model (llama3, mistral, Gemma, etc.), we can talk to it (either from the Terminal or from a ChatGPT-style graphical interface) and integrate it with other applications or APIs.
The main advantage of Ollama is that everything happens within our local environment. Thanks to this, our data will be completely secure. If, in addition, we have good hardware, we will get great results in terms of speed.
Data extraction and indexing with LlamaIndex
Before defining what LlamaIndex is and what it consists of, let’s briefly explain what a RAG is. Retrieval Augmented Generation (RAG) is a technique that combines the capabilities of an LLM with information from external sources. In the articles Retrieval Augmented Generation: What is RAG? and RAG Implementations and Extensions we discussed this concept in detail.
LlamaIndex is nothing more than a Python library used to generate RAGs in a very easy way. It extracts the text, indexes it, searches it and connects it to the model.
Case study: Create a basic chatbot
Now that we know what FastAPI, Ollama and LlamaIndex are and what they are used for, it is time to put them into practice by means of a simple example.
Prerequisites
Before we start, let’s review some of the requirements needed for the use case to work properly:
- It is recommended to have a computer with at least 8 to 16 GB of RAM. Ollama has several models of different sizes. The choice of one or the other will depend on the capacity of your machine.
- To achieve good results in terms of performance, it is advisable to have a modern GPU and a CPU with at least 4 cores. Ollama models will perform much better if they fit completely in the VRAM of the GPU.
- As for disk space, ideally about 20 GB should be allocated for working with models and data.
- The example is based on macOS, but can be adapted to other operating systems such as Linux or Windows.
First steps with FastAPI
First of all, we will create a new directory that will be the root of the project running from our terminal:
mkdir fastapi-rag-test
cd fastapi-rag-test
In addition, we will set up the virtual environment that we will use to work on the project:
python -m venv .venv

# To activate it, we run the command
source .venv/bin/activate
Next, we install FastAPI and Uvicorn with the following command:
pip install fastapi uvicorn requestsUvicorn is a lightweight web server that allows you to run FastAPI from the browser and make HTTP requests to it.
In this equation, FastAPI acts as an intermediate layer between the model and the user by separating the underlying technology from the business logic. What are the implications of this? It means that, although we are now using Ollama, we could very well switch to another system (for example, ChatGPT) without affecting other applications that already consume this API. This provides great flexibility, since it would only be necessary to modify the internal logic of the endpoint if, when the time comes, we want to work with other models.
Installing Ollama
The next step is to go to the official Ollama website and download the installer for your operating system. Once installed, we launch the command ollama run llama3 to work with the llama3 model and verify that the installation is correct.
Inside the fastapi-rag-test directory, create the main.py file and add the following content:
from fastapi import FastAPI
from pydantic import BaseModel
import requests
app = FastAPI()
class ChatRequest(BaseModel):
    message: str
    model: str = "llama3"
@app.post("/chat")
def chat_with_ollama(request: ChatRequest):
    url = f"http://localhost:11434/api/generate"
    payload = {
        "model": request.model,
        "prompt": request.message,
        "stream": False
    }
    response = requests.post(url, json=payload)
    if response.status_code == 200:
        return {"response": response.json()["response"]}
    else:
        return {"error": "Error connecting to Ollama", "details": response.text}
Then, and from the Terminal, we launch FastAPI executing:
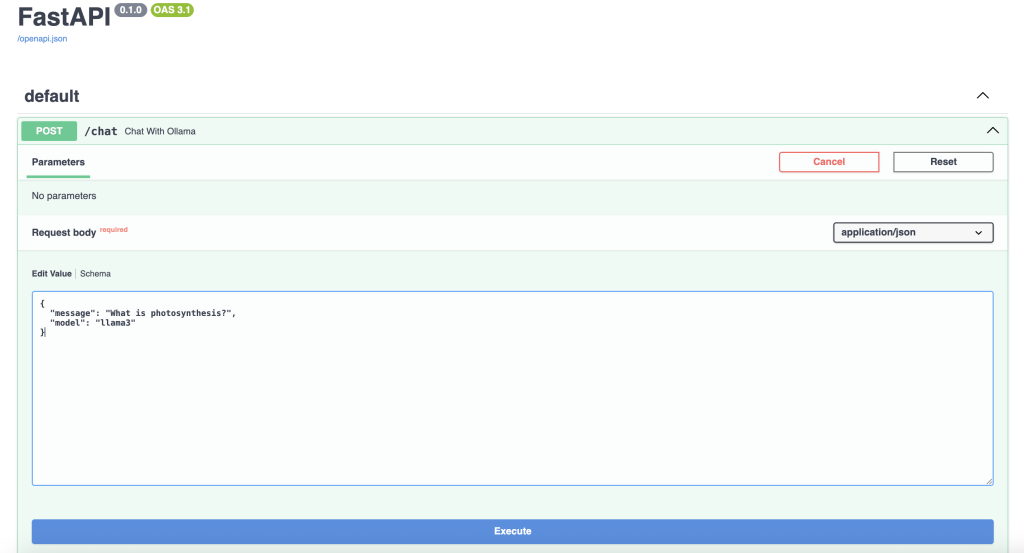
uvicorn main:app --reloadIf we now access http://localhost:8000/docs from our browser, we will see the FastAPI graphical interface and we will be able to start communicating with our model.
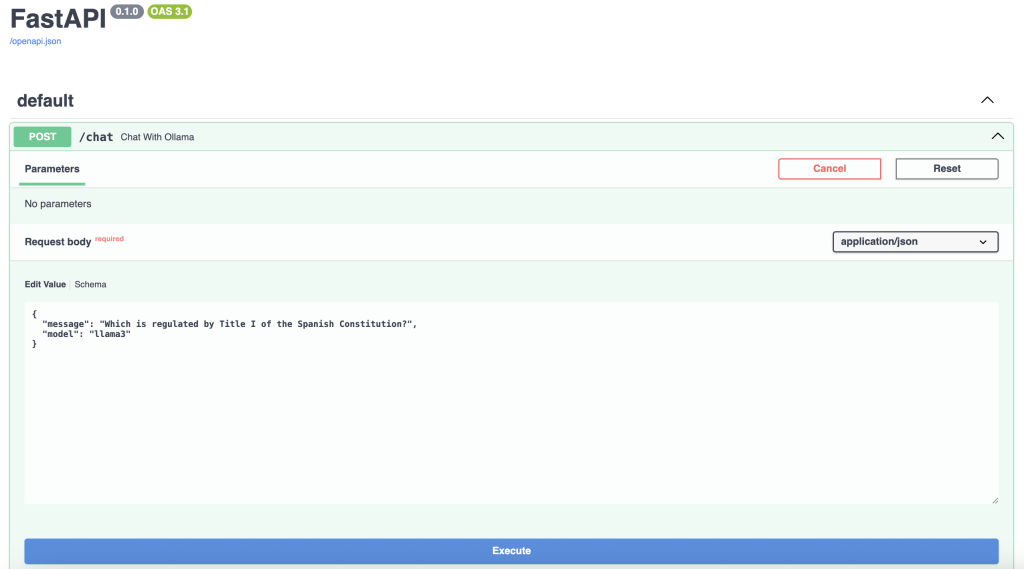
When you click on the POST button, a drop-down menu opens where you can enter the question you want to ask the LLM. If we click on Try it out, the Request body will be enabled, which is where we will enter the information we want to request to the model.

Next, click on Execute and, after a few seconds, the model will return the requested information.
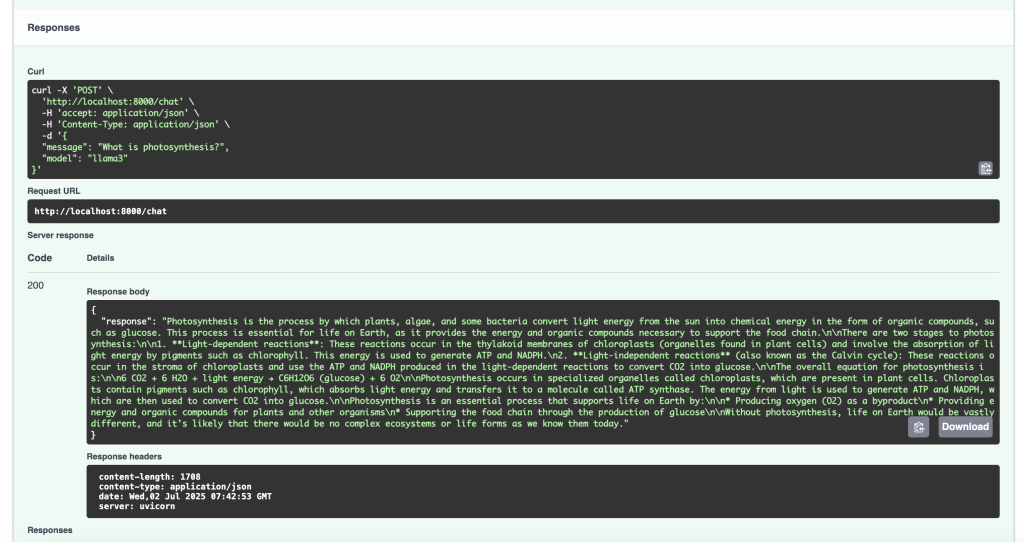
The user launches a request through FastAPI that is answered by Ollama based on the internal knowledge of the model (in this case, llama3) that has been previously trained. In this case, it is not drawing from any external source of information, it relies solely on what it knows from that training.
So far, we have managed to create a simple chat with FastAPI and Ollama. We now have an LLM ready to answer questions from our own machine, without the need to connect to the Internet.
Build a custom chatbot locally
Next, we’ll add some more complexity to the equation by creating a RAG system with LlamaIndex. So far, the answers the model gives us are based solely on its internal knowledge. What we will do is to add the ability to query external documents and the answers it gives us are based on them. In this case, we are going to transform our LLM into an expert teacher who will help us prepare for the public examinations.
Build a RAG
To do this, we make some changes in the main.py file, which would be as follows:
from fastapi import FastAPI, Request
from llama_index.core import VectorStoreIndex, SimpleDirectoryReader
from llama_index.llms.ollama import Ollama

app = FastAPI()

# Load the documents in the local directory /data
documents = SimpleDirectoryReader("data").load_data()

# Indicate to the LLM that the model used is llama3. It is important to have previously executed 'ollama run llama3'
llm = Ollama(model="llama3")

# Create the vector index
index = VectorStoreIndex.from_documents(documents, llm=llm)

# Create the chat to communicate with the LLM
query_engine = index.as_query_engine()

@app.post("/chat")
async def chat(request: Request):
   data = await request.json()
   question = data.get("message")
   response = query_engine.query(question)
   return {"response": str(response)}
As we can see, new LlamaIndex libraries have been imported and some changes have also been applied so that the model extracts the information from the /data directory.
- llama-index. This is the main LlamaIndex library that will allow us to connect the documents we load with the LLM to ask the corresponding questions.
- llama-index-llms-ollama. It is used so that the Ollama model that we have locally communicates with LlamaIndex.
To install LlamaIndex, we have to execute:
pip install llama-index llama-index-llms-ollamaAt this point, we will create a new directory, /data, where we will store the documents that contain the information that the model will provide us when we ask it. We will add two example files, doc1.txt and doc2.txt.
The final structure of the project should look like this:
fastapi-rag-test/
├── data/
│   ├── doc1.txt
│   └── doc2.txt
├── main.py
└── .venv/
Inside the /data folder, we will add the documents with topics related to the public examinations we are preparing (for example, the Spanish Constitution), which the model will take as data source.
Once the main.py file has been modified and the documents have been uploaded, we execute:
uvicorn main:app --reload How to launch requests to the RAG
Through our browser, we access again to http://127.0.0.1:8000/docs.
This time, we will ask the model a question about something specific that is in the documents that we have added in the data folder.
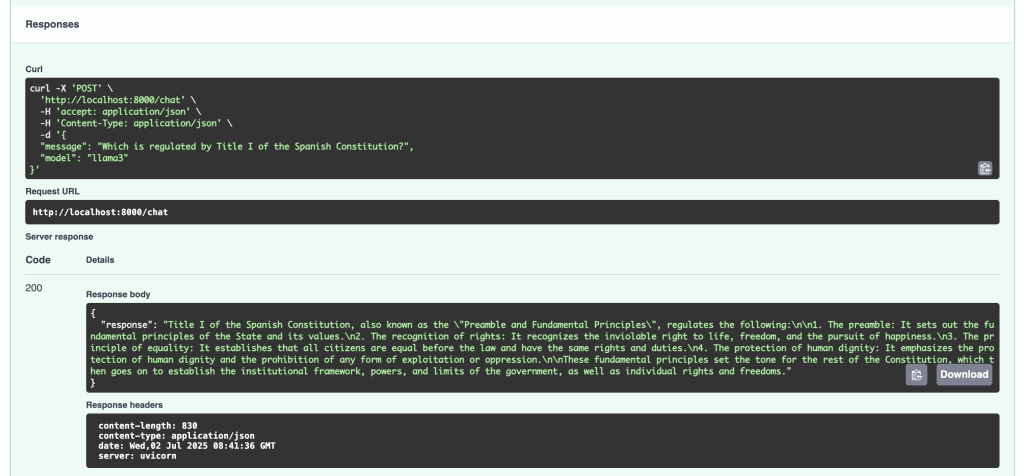
As we can see, the LLM is answering us based on the information he has found in these documents.
How do the three integrated components work? The user sends a query (a POST request) through a web browser or frontend with FastAPI. FastAPI receives it and, using LlamaIndex, searches the data sources. Once it reviews the documents, LlamaIndex extracts the relevant information and sends it to Ollama. Based on it, Ollama elaborates a response that is returned by FastAPI to the user through the browser.
Next steps
To finish building our model teacher of public examinations, it would be enough to add new documents or topics inside the /data folder. We could add from official documents to our own customized notes.
However, it should be noted that, in the example given, LLM only reads .txt documents. In case you need to add other text formats (.pdf, .docx, etc.) you would have to consider installing additional dependencies.
An interesting improvement that could be applied to the project is to use it with a graphical interface such as Open WebUI. In this way, we can get an experience very similar to that offered by popular LLMs such as ChatGPT.
Conclusion
The possibility of building a chatbot in a local environment capable of learning from the content provided by the user is a great evolution in the area of Artificial Intelligence. The proliferation of open source tools and frameworks in this line is allowing developers to explore new avenues and be part of these technological advances.
If you found this article interesting, we encourage you to visit the Data Engineering category to see other posts similar to this one and to share it on social networks. See you soon!
