
In this article, we present the definitive guide to setting up a PySpark development environment in PyCharm, one of the most complete options.
Spark has become the Big Data tool par excellence, helping us to process large volumes of data in a simplified, clustered and fault-tolerant way.
We will now see how to configure the PySpark development environment in PyCharm, which among the different options available on the market as a development IDE, the community version of PyCharm is one of the most complete options.
The environment on which we will perform the installation will be an Ubuntu machine with the following dependencies installed:
- Python 3.8 (largest version currently maintained)
- Java 11
- PyCharm Community
The first thing to do is to download the compiled version of Spark. Currently, the latest version of Spark is 3.0.1. It is advisable to download the packaging that does not contain the Hadoop dependencies. This way, we can decouple the Hadoop and Spark versions and combine them as long as they are compatible.
Installing Hadoop and Spark
- We download the Spark packaging and unzip it to
/opt.
cd ~/
curl -O http://apache.mirror.anlx.net/spark/spark-3.0.1/spark-3.0.1-bin-without-hadoop.tgz
tar -xvzf spark-3.0.1-bin-without-hadoop.tgzsudo mv spark-3.0.1-bin-without-hadoop /opt2. Now create a symbolic link to the unzipped folder. This link will allow us to change the Spark version while keeping the environment variables.
sudo ln -s spark-3.0.1-bin-without-hadoop spark3. Once Spark is installed, we must proceed with the same steps for the Hadoop download.
cd ~/
curl -O http://apache.mirror.anlx.net/hadoop/common/hadoop-3.2.1/hadoop-3.2.1.tar.gz
tar -xvzf hadoop-3.2.1.tar.gzsudo mv hadoop-3.2.1 /opt sudo ln -s hadoop-3.2.1 hadoop4. Once we have Spark and Hadoop linked to our symbolic links (spark and hadoop respectively inside /opt), we must link the necessary environment variables. This ensures that the context of our terminal sessions recognise the two new tools.
To do this, we must add the export of the following environment variables to our bashrc, zshrc or similar, which we use as a terminal session initialiser file.
#HADOOP
export HADOOP_HOME=/opt/hadoop
export HADOOP_CLASSPATH=$HADOOP_HOME/share/hadoop/tools/lib/*
export HADOOP_CONF_DIR=$HADOOP_HOME/etc/hadoop
export PATH=$PATH:$HADOOP_HOME/bin

#SPARK
export SPARK_HOME=/opt/spark
export PATH=$SPARK_HOME/bin:$PATH
export SPARK_DIST_CLASSPATH=$(hadoop --config $HADOOP_CONF_DIR classpath)
export SPARK_DIST_CLASSPATH=$SPARK_DIST_CLASSPATH:$SPARK_HOME/jars/*
* Note: We recommend having this initialisation separate. At Damavis, we usually create a file called ~/.spark_profile which is loaded from the rc file, with the source ~/.spark_profile statement.
5. Now when you open a new terminal session, you should be able to launch the following commands:
hadoop versionspark-shellSample project with PyCharm
The first thing to do is to download the following example project with Git:
git clone https://github.com/damavis/spark-architecture-demo.gitWe import the downloaded project with PyCharm and open it. In this scenario, to run the project, we have two options:
- The first and immediate step would be to create a virtual environment with conda or virtualenv by installing the dependencies specified in
setup.py. - Run the code with the Spark and Hadoop configuration.
If the latter is chosen:
- Add the PySpark libraries that we have installed in the
/optdirectory.
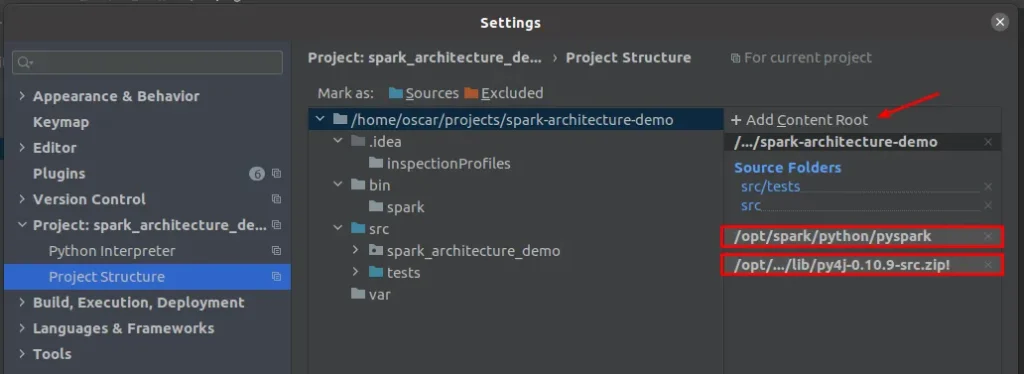
To do this, open settings and go to the Project Structure section. There we must add the contents of the following directories:
/opt/spark/python/pyspark/opt/spark/python/lib/py4j-0.10.9-src.zip
- At this point, we can run
mainwhich is insidesrc.
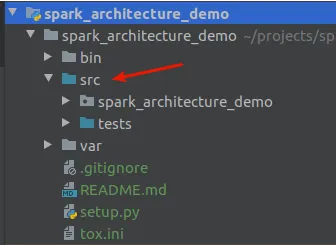
It is recommended, to avoid having to configure the python_path, to set thesrcfolder as source. To do this, right click on the folder and mark it as source.
3. Finally we run the main.py file and set an environment variable to be able to launch and debug the PySpark code.
PYSPARK_SUBMIT_ARGS=--master local[*] pyspark-shellIf, when running the application, there are any binary packaging dependencies, you can set the arguments as they appear within the Apache Spark documentation. For example:
PYSPARK_SUBMIT_ARGS=--master local[*]  --packages
org.apache.spark:spark-avro_2.12:3.0.1 pyspark-shell
Conclusion
With this configuration we will be able to debug our PySpark applications with PyCharm, in order to correct possible errors and take full advantage of the potential of Python programming with PyCharm.
If you found this post useful, visit our blog and find more articles like this one in the Data Engineering category. Don’t forget to share it with your contacts so they can also read it and give their opinion. See you in networks!
