
Usually, when we start working on a new integration where it is necessary to connect to AWS services in the early stages of development, it is easier and faster to work only locally. For this, we can make use of the LocalStack tool that will allow us to mock over the AWS services.
What is LocalStack?
According to its creators, Localstack is defined as “A fully functional local AWS cloud stack. Develop and test your cloud & Serverless apps offline!”. This tool provides a range of services, free of charge, that will facilitate the development and testing cycle of a pipeline or integration.
Among the free services available are: dynamodb, ec2, S3, redshift, lambda, sns, sqs, kinesis, among others.
With this in mind, you could test a whole integration by collecting data from S3 or another source or perform some kind of transformation using, for example, Spark and upload it back to another S3 bucket. All this without leaving our development environment.
Airflow integration with Localstack
The first thing we will need is to have Docker installed (you can check the post Introduction to dockerization and customization of Apache Airflow to see how to do it) and choose the Airflow image we want to work with. We have to keep in mind that the minimum Airflow version required is 2.2.0, since we would have compatibility problems if we choose the latest version of the Amazon provider package.
The final docker-compose will have 2 main configurations: the Airflow configuration on the one hand and the LocalStack configuration on the other.
Regarding the LocalStack configuration, it is important to note that you can add a new environment variable to limit the services you want to run.
environment:
- SERVICES: s3,s3api,dinamodb
Once we have the containers up, we must install awslocal, using the following command pip install awscli-local. AWS local is a wrapper over the AWS command interface where the requests to LocalStack are simplified, as we can see in the following example:
- Using aws-cli:
aws --endpoint-url=http://localhost:4566 s3 ls - Using awslocal:
awslocal s3 ls
Testing LocalStack with Airflow and AWS
To do this test on LocalStack, it would be interesting to contemplate the following scenario.
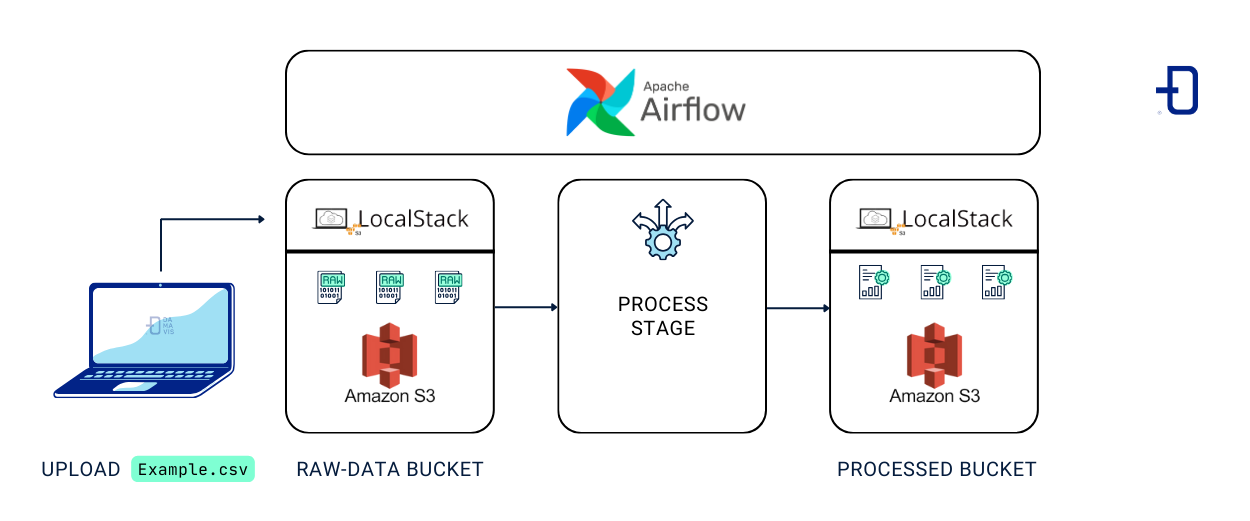
First, we create our S3 bucket structure from our host using awslocal. The raw-data bucket will be created as an entry point for data that has not been processed and processed-data for data that has been manipulated. Also, we will upload a file (csv) from our local computer to the LocalStack S3 bucket.
Note: This step could also be done using Airflow, but I consider interesting to see how we can manipulate the bucket through our host and, in the following steps, how the integration could be done through Airflow.
Next, we make the Airflow connection to the Localstack container.
Finally, we will run a Dag that will download the example file from the raw-data bucket, apply a transformation to it and then upload it to the processed-data bucket.
Structure creation in S3
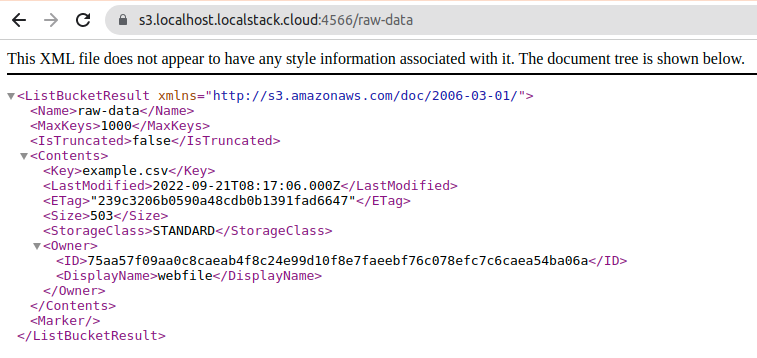
$ awslocal s3api create-bucket --bucket raw-data
{
"Location": "/raw-data"
}
$ awslocal s3 cp resources/example.csv s3://raw-data/example.csv
upload: resources/example.csv to s3://raw-data/example.csv
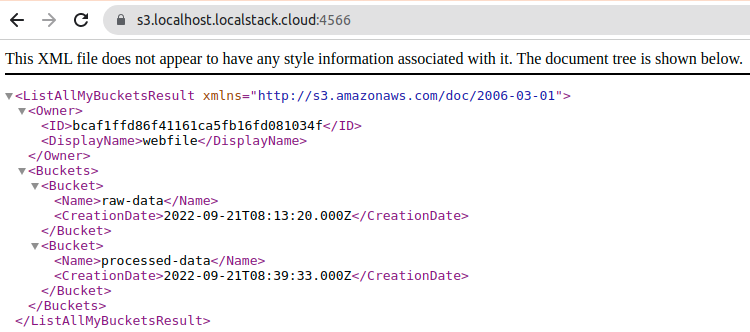
$ awslocal s3api create-bucket --bucket processed-data
{
"Location": "/processed-data"
}If we check the bucket from the browser, we can see that they have indeed been created and that the document has been loaded successfully.
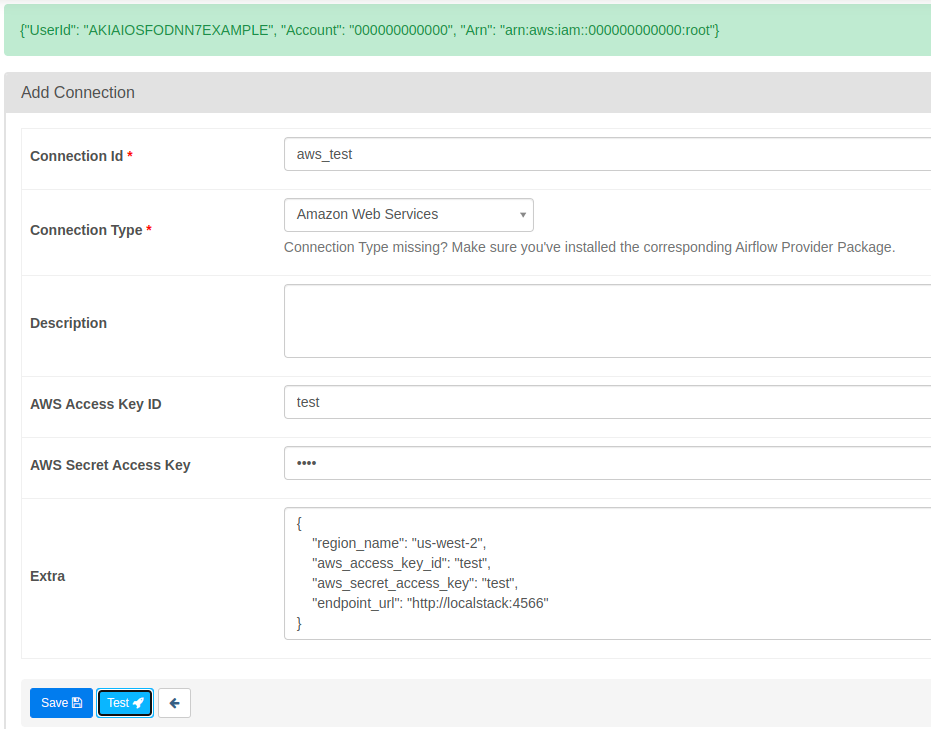
Connecting Airflow with LocalStack
We start from http://localhost:8080 which will open the Airflow window. We go to connections and create a new Amazon Web Services connection. In the “Extra” parameter we add the following JSON.
{
"region_name": "us-west-2",
"aws_access_key_id": "test",
"aws_secret_access_key": “test",
"endpoint_url": "http://localstack:4566"
}
In the JSON above, the most important part is the endpoint_url parameter, which tells Airflow which endpoint to attack to establish the connection to our LocalStack container.
When testing the connection, we will have the following output informing us that the connection is ready to be used.
Performing the DAG and testing the integration
For this demonstration, we will make use of the S3FileTransformOperator operator. This operator will download the data from S3 to our worker node, apply a transformation using the provided script path and upload the data to S3 to the indicated target bucket.
When using this type of operators, we have to take into account the volume of data we are handling. Airflow is not a tool to manipulate the data, but should be used as an orchestrator of the processes that manipulate the data.
from datetime import datetime
from airflow.models import DAG
from airflow.operators.bash import BashOperator
from airflow.models.variable import Variable
from airflow.providers.amazon.aws.operators.s3 import S3FileTransformOperator
SOURCE_KEY = Variable.get("s3_source_key", "s3://raw-data/example.csv")
DEST_KEY = Variable.get("s3_dest_key", "s3://processed-data/example-{{ ts }}.csv")
DEFAULT_ARGS = {
'start_date': datetime(2022, 9, 20),
'schedule_interval': '@hourly',
'catchup': False,
}
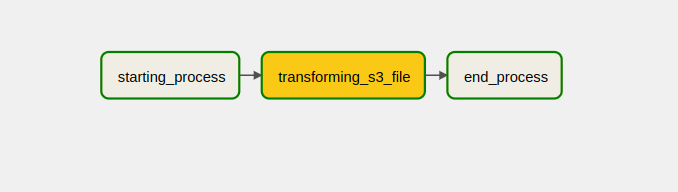
with DAG(dag_id='localstack_concept_example',
default_args=DEFAULT_ARGS) as dag:
starting_process = BashOperator(
task_id='starting_process',
bash_command="echo starting process")
transforming_s3_file = S3FileTransformOperator(
task_id='transforming_s3_file',
source_s3_key=SOURCE_KEY,
dest_s3_key=DEST_KEY,
transform_script="/bin/cp",
replace=False)
end_process = BashOperator(
task_id='end_process',
bash_command="echo SUCCESS!")
starting_process >> transforming_s3_file >> end_processOnce the DAG has been executed we will obtain the following response:
[2022-09-21, 10:16:58 UTC] {s3.py:567} INFO - Downloading source S3 file s3://raw-data/example.csv
[2022-09-21, 10:16:59 UTC] {s3.py:573} INFO - Dumping S3 file s3://raw-data/example.csv contents to local file /tmp/tmpet619eys
[2022-09-21, 10:16:59 UTC] {s3.py:589} INFO - Output:
[2022-09-21, 10:16:59 UTC] {s3.py:600} INFO - Transform script successful. Output temporarily located at /tmp/tmputbuquyr
[2022-09-21, 10:16:59 UTC] {s3.py:603} INFO - Uploading transformed file to S3
[2022-09-21, 10:16:59 UTC] {s3.py:610} INFO - Upload successful
If we check the bucket, we can see that the file has been created, so the process has been performed correctly.
$ awslocal s3 ls s3://processed-data
2022-09-21 12:16:59        503 example-2022-09-21T10:16:56.771385+00:00.csv
Conclusion
In this post we have seen how simple and easy it is to integrate with Airflow and LocalStack to start developing pipelines without leaving our local environment, being a good tool to start development at an early stage without incurring unnecessary expenses.
So much for today’s post. If you found it interesting, we encourage you to visit the Software category to see similar articles and to share it in networks with your contacts. See you soon!
