
In the world of data engineering, the efficient organization and structuring of process flows plays a crucial role. At this point, Apache Airflow has positioned itself as one of the most efficient tools to achieve this task. However, to maximize its full potential, it is advisable to perform a dockerization process that allows its encapsulation, achieving a significant advantage.
In this article you will learn how to dockerize Apache Airflow and how to configure it according to the needs of your project.
What are Docker and Apache Airflow and what are their features?
Docker is a platform that allows the encapsulation of applications and their dependencies in isolated environments called containers. Each container runs independently, but all of them share the kernel of the operating system of the machine that hosts them. As you can imagine, this is a very powerful concept, since this container-based architecture allows minimizing the consumption of system resources while enabling the autonomy of the dependencies in each of the projects.
On the other hand, Apache Airflow is a workflow orchestration platform that allows the automation, scheduling and monitoring of complex processes. This is achieved through a structure based on DAGs (Directed Acyclic Graphs) in which complex workflows can be defined in a declarative and simple way. In addition, these workflows can be visualized through a graphical interface, simplifying their monitoring and making it possible to identify problems that arise during execution quickly and intuitively.
What are the advantages of dockerizing Apache Airflow?
There are many reasons why it is highly recommended to use Docker to deploy and manage Apache Airflow, and among the most important are the following:
Portability
Docker can run in any environment that has docker installed. That is, it can be run regardless of the operating system on the computer. This, although it may seem irrelevant, is especially important if you intend to run Apache Airflow on different machines, as it allows you to abstract from the underlying system and guarantee its execution, establishing, in addition, an independence between different environments such as, for example, production and development.
Isolation and Consistency
Docker also provides isolation, meaning that you can encapsulate all dependencies on Apache Airflow or any other application, including specific libraries, tools and configurations. This prevents conflicts between dependencies and ensures consistency across environments.
Fast and reproducible distribution and deployment
Distributing a Docker image is surprisingly easy, since it is enough to package the application components and dependencies in an image, and then store it in a private registry or upload it to Docker Hub, among other options. Therefore, it will be enough to package Apache Airflow with the desired configuration in a custom image and share it so that it can be deployed on any system.
Scalability
Also noteworthy is the scalability that Docker allows. The use of orchestrators that manage Apache Airflow and balance the container load, allows the container to adapt to the work demand, making possible a horizontal scalability that guarantees optimal performance.
As you can see, there are a variety of reasons, and many others that have not been named, why it is advisable to use docker to encapsulate Apache Airflow or any other application. Being also, as I will explain below, a relatively simple process that does not require a great dedication of time.
How is Apache Airflow dockerization performed?
This process is incredibly simple, since Airflow already comes with a default configuration and we can download the docker-compose.yaml file directly from their website.
Having said that, the first step, if we are going to use Docker and docker compose, is to install both on our system. The process may vary depending on the operating system you are on, however all the steps are detailed in the official documentation for both docker and docker compose.
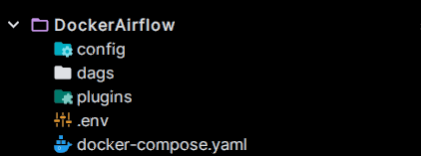
Once installed, we will create a folder to house all the files and be able to download in it the docker compose containing the official Airflow image:
Commands:
mkdir DockerAirflowcd DockerAirflowcurl -LfO 'https://airflow.apache.org/docs/apache-airflow/stable/docker-compose.yaml‘
This will download a file called docker-compose.yaml that will contain all the necessary configuration to deploy Airflow. That file can be modified and adapted to the different needs of each project, but we will see that later.
This file will create 4 volumes (dags, logs, config and plugins) that will be used to synchronize the container with the local machine.

This means that everything included in these folders will be automatically synchronized with the container and it will be in the dags folder where we will have to save the dags that we want our dockerized Airflow to recognize. For that reason, once we have the docker-compose.yaml file in our path, the next step will be to create these folders in our machine.
Commands:
mkdir -p ./dags ./plugins ./logs ./config
Finally, we will need to set some environment variables in an `.env` file to make sure that the user permissions on the host and on the containers are the same.
Commands:
echo -e "AIRFLOW_UID=$$(id -u)\nAIRFLOW_GID=0" > .env
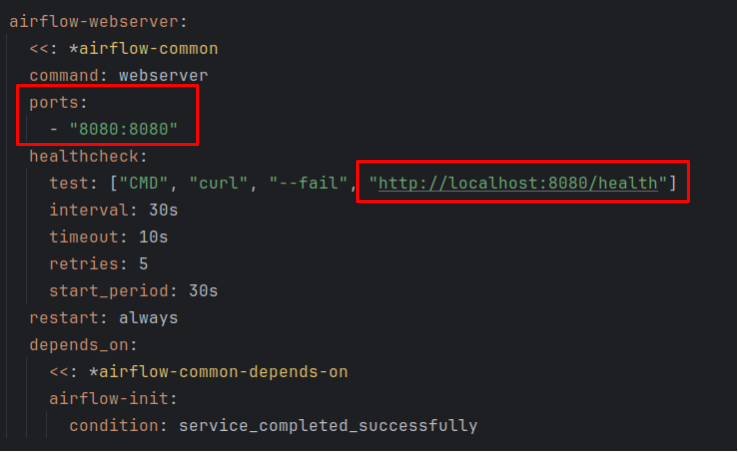
And with that we would already have everything we need to initialize Apache Airflow with docker compose, with which we would only have to raise the container and access the localhost on the specified port (by default 8080).
Commands:
- Raise airflow:
docker compose up -d - Stop airflow:
docker compose down
Modifications and recommended configuration
As I mentioned before, the docker-compose.yaml file that we have downloaded can be modified to adapt it to the needs of each project. To do this, we will only have to access it through a text editor and modify what we consider appropriate.
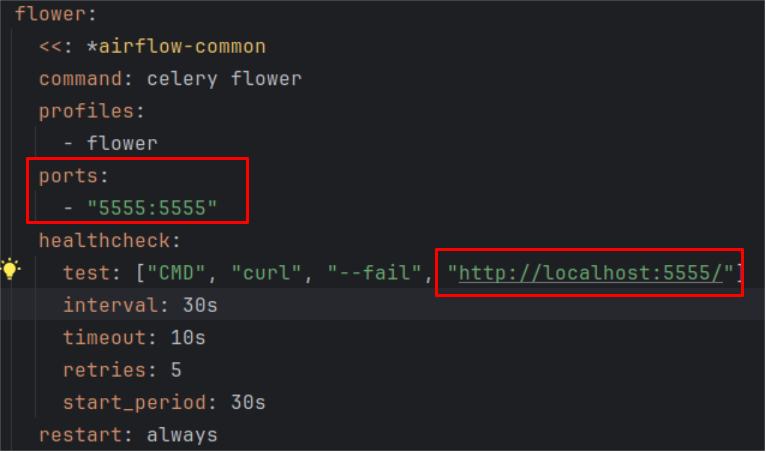
When modifying it, it is necessary to take into account that there are certain aspects that are relatively important to know in order to take full advantage of Airflow, such as changing the user and password with which we want to access, the exposed ports of the UI or the Flower service (a monitoring and administration tool for célery).

However, the capacity offered by Airflow to configure its services does not stop there, but through the airflow.cfg file we can access a variety of options that will allow us to further customize how Airflow will behave once deployed.
This file, located in the root path of our container, is the cornerstone of the Airflow configuration, since, from it, we will be able to adjust several options that affect the performance, functionality and security of the system.
To access the file once the container has been deployed, we can use the following command:
docker exec -it <container_name> bash
Once in the container, you can edit the file with the editor of your choice.
Regarding the file, some of the most relevant changes that can be made are the following:
Dags_folder | plugins_folder | base_log_folder: These will be the paths where the dags, plugins and logs will be stored respectively in our container, so it is important that they point to the volume we have previously created. By default, they already come to the base paths, but if we change the configuration of the docker-compose.yaml file, we should also change the locations in this file and vice versa.

Default_timezone: With this parameter you can configure the default time zone of Airflow. This time zone will be the one used when programming and executing the different tasks. The basic configuration of this parameter is UTC, but a possible alternative if you want it to run in Spanish time would be to configure it with “Europe/Madrid”.

Parallelism and max_active_run_per_dag: Although these parameters are independent, they are quite related to each other, since the configuration of one could affect the other and a suboptimal configuration of these parameters could result in not using all the available resources.
On the one hand, parallelism directly affects system performance and resource utilization, as it is used to control the maximum number of tasks that can run simultaneously in Airflow. As it is logical, the more tasks in parallel, the more resources must be available, so it is important to make this setting with caution, because if you restrict it too much you can overload the system or, on the contrary, if you oversize it, you will leave resources underutilized.
On the other hand, the max_active_run_per_dag parameter controls the maximum number of active runs that can be performed simultaneously on a specific DAG. That is, while the parallelism parameter affected Airflow as a whole, this parameter affects each DAG individually, as it limits the number of instances of that DAG that can run at the same time.
For example, Airflow is configured by default with parallelism = 32 and max_active_runs_per_dag = 16. With this configuration, it means that we can only have two dags running at maximum capacity at the same time, since the execution of a third dag would exceed the 32 simultaneous tasks configured in parallelism.

Loggin_level and simple_log_format: These parameters are also closely related. On the one hand, as its name indicates, loggin_level sets the level of detail with which we want the logs generated by Airflow to be recorded. By default it is set to “INFO”, which would log informative messages and higher levels, but it also accepts “CRITICAL”, “ERROR”, “WARNING” and “DEBUG” levels, being debug the least restrictive, since it would log all logs and critical the most restrictive since it would only log the logs that are critical for the system.
On the other hand, simple_log_format defines the format in which the logs are recorded when the log level is equal or higher than “INFO”. By default it is set to “%(asctime)s [%(levelname)s] – %(message)s”. This will include a timestamp (‘asctime’), the log level (‘levelname’) and the message itself (‘message’), however, it can be configured to log in a custom format depending on the needs of each project or developer.

Job_heartbeat_sec: This parameter is used by Airflow to determine whether a job that is running has failed or is running correctly. That is, it sets the number of seconds that must elapse since the last reception that it is executing correctly for Airflow to interpret that the job has failed. By default it is set to 5 seconds, which means that it will wait for a signal that everything is running as it should at least once every 5 seconds and if the worker does not send that signal within that time, Airflow will consider that the job has failed.
Therefore, the higher the number of seconds specified in this field, the less restriction will be set, whereas if it is set much more restrictively, such as 1 second, it means that every second a signal must be received that everything is correct or else it will mark the job as failed.

Finally, there are a number of parameters that can be adjusted in this airflow.cfg file that are more related to Airflow’s UI than to its performance, but it can still be interesting to configure them in a customized way to have a customized experience.more adjusted to our tastes. At this point the following parameters stand out:
Config_file: This parameter allows us to set the path where the webserver_config.py file will be located, with which we can configure the webserver parameters, as well as set different Themes already configured that allow us to modify the way in which the Airflow UI is displayed.

Dag_default_view: Allows to set the default view that we want the dags to have in the UI. By default it comes with the “grid” configuration, however, it allows these other options: “graph”, “duration”, “grantt”, “landing_times”.

Dag_orientation: Finally, and although there are many more parameters that allow to customize Airflow even more in depth, I am going to comment this parameter that allows to set the default view of the graphics displayed of the DAGs in the UI. By default it is set to “LR” which stands for Left to Right, i.e. displayed from left to right. However, it also allows “TB” (Top to Bottom), “RL” (Right to Left) and “BT” (Bottom to Top).

Conclusion
As this post has shown, there are many reasons why dockerizing Apache Airflow is not only a good practice, but also a simple, convenient and easily configurable process. And while it is true that you can use Apache Airflow without dockerizing, the advantages associated with this process are numerous compared to the extra effort involved in configuring it.
We have also explored in detail how to configure Apache Airflow, both the implementation in Docker environments, as well as the direct customization in its own native configuration, allowing us not only to have precise control of how all tasks are executed and how the system resources are structured, but also to customize and adapt the user interface to fit our style and needs.
If you found this article interesting, we encourage you to visit the Software category to see all the related posts and to share it on social networks. See you soon!
