
When reviewing code, we often spend time going over small bugs or stylistic details that distract us from what’s really important. In this post we will introduce pre-commit, a tool that attacks this problem by automatically correcting our code.
What is pre-commit and how does it work?
Before explaining what pre-commit does, it is important to be clear about certain aspects of Git, and specifically about Git Hooks. This is the mechanism offered by Git to execute scripts at different key points, such as a commit or a merge. In this way, we can define a script (Hook) to be executed just before a push or after a merge.
Considering the above, we can say that pre-commit is a framework that allows us to add, manage and execute those hooks in a simple way. As we will see in the practical example below, it offers an endless number of hooks ready to use in multiple languages.
Practical example
The first thing we will do is to install pre-commit with pip:
pip install pre-commitWe can validate the installation and its version with:
pre-commit --versionOnce we have pre-commit installed, we will open the project in which we want to use it and create the .pre-commit-config.yaml file, which will contain the configuration with which we want the tool to work.
An example of a configuration file could be the following:
repos:
-   repo: https://github.com/pre-commit/pre-commit-hooks
    rev: v3.2.0
    hooks:
    -   id: trailing-whitespace
    -   id: end-of-file-fixer
    -   id: check-yaml
    -   id: check-added-large-files
We see how to define the repositories from which the hooks are going to be taken (at the moment, we are only using one repository) and the respective hooks. These are general checks, but we can add new hooks according to our preferences.
How to work with Hooks
In Supported Hooks you can find a list with different hooks available. In our case, we are going to customize the configuration file as follows:
default_stages:
  - commit
  - push
fail_fast: true
repos:
-   repo: https://github.com/pre-commit/pre-commit-hooks
    rev: v3.2.0
    hooks:
    -   id: trailing-whitespace
    -   id: end-of-file-fixer
    -   id: check-yaml
    -   id: check-added-large-files
    -   id: detect-private-key
    -   id: double-quote-string-fixer
-   repo: https://github.com/asottile/dead
    rev: v1.5.0
    hooks:
    -   id: dead
-   repo: https://github.com/dannysepler/rm_unneeded_f_str
    rev: v0.1.0
    hooks:
    -   id: rm-unneeded-f-str
Firstly, we notice that default_stages has been added, where we define the stages at which we want the hooks to fire. In this case, we have defined that they will be triggered before a commit or a push. This will only have an effect on hooks that have no stages defined.
Next is fail_fast, which defines the policy after a failure is encountered: continue execution (false) or stop (true).
We have also added new hooks, both from the previously used repository and from new repositories.
Git Hooks Configuration
Once we have our configuration file ready, we run the following command to configure the Git Hooks.
pre-commit installWith this, pre-commit would be ready to improve our commits. However, if we are going to use it in an existing project, it might make sense to review all the current code instead of reviewing the files that are going into new commits. We can do this with the following command:
pre-commit run --all-filesBoth running pre-commit against all files and committing, it will show us the result and the actions performed. In the following screenshot we can see how it shows the phase in which it has failed (Fix End of Files) and the affected files, in this case main.py.
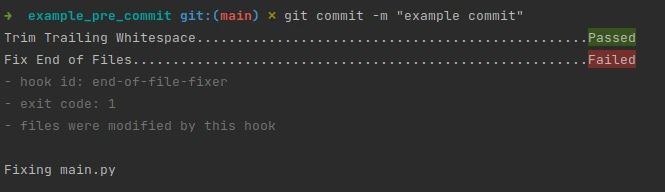
We note that no further hooks have been executed after the failure. This is due to the fail_fast configuration we defined earlier.
If we check the files involved, we can see that the hook has applied the necessary changes for us.
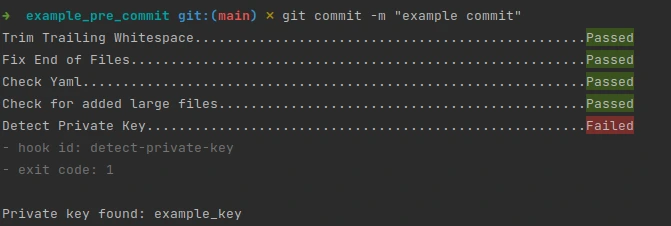
We can also see how private keys are identified with the respective hook:
Conclusion
In this post we have introduced pre-commit, a tool that allows us to find bugs in our code automatically. We have seen how to install it and a brief use case.
And that’s all! If you found this article interesting, we encourage you to visit the Software category to see all the related posts and to share it on social networks. See you soon!
