Git is a version control system that has become an essential tool for software development. It allows teams of developers to work collaboratively on the same code and efficiently manage change history.
In this post we will introduce Git at a very high level. The topics covered include a quick installation and configuration guide and we will also look at how to create a repository. On the other hand, we will also briefly discuss Git’s relationship with the Continuous Integration (CI) and Continuous Deployment (CD) processes and explore some related concepts. Finally, a glossary of the most commonly used commands and a short review of best practices in their use will be included.
What is Git and why is it necessary?
Created by Linus Torvalds in 2005, Git is a distributed version control system that has since become the de facto standard for this type of tool. As a version control system, Git makes it possible to track changes to a project’s files, to coordinate work between multiple developers quickly and efficiently, and to revert those changes if necessary.
Applied to Git, the adjective distributed is justified by the fact that each developer has a complete copy of the repository on their machine, including the change history. The developer in question can make changes locally that will potentially be incorporated into the remotely reposted version of the code.
Git and CI/CD processes
CI and CD are practices that automate and streamline software development processes.
Continuous Integration (CI) is about automating the integration of code, ensuring that changes made by developers are frequently incorporated into the main repository and tested automatically. Integrations are verified through automated builds and tests. These help to detect bugs quickly and maintain code quality. Popular CI/CD tools such as Jenkins, Travis CI or CircleCI integrate tightly with Git to provide these services.
On the other hand, Continuous Deployment (CD) is the natural extension of CI. Once the code has passed all the tests, it is automatically deployed to a test environment (and then, eventually, to a production environment). This ensures that the software is always in a working state and that changes are available quickly and securely. Tools such as Docker and Kubernetes are often used to manage and automate the CD process.
As mentioned, in these CI/CD processes, the role of Git is fundamental in that it is closely linked to CI. Git makes it possible for changes to be continuously and effectively integrated into the code to be deployed with the CI tools.
Git installation and initial configuration
Installing
How you install Git will depend on your operating system:
On Linux you can use the distribution’s package manager. For example, for Debian or Ubuntu:
$ sudo apt-get install gitIf we want to use it on macOS, it can be installed using Homebrew:
$ brew install gitWindows users will need to download it from Git for Windows and follow the instructions to install it.
Initial configuration
After installing Git, it is important to configure it with the developer’s contact and identification details, so that the contributions they make are correctly tagged. This configuration is a one-time setup and will apply to all Git activities on the system from then on.
$ git config --global user.name “First name Last name(s)“
$ git config --global user.email
“address@youremailprovider.com“
We verify the configuration:
$ git config --listCreating and configuring a repository
A Git repository is where the history of a project is virtually stored. You can create one from scratch or clone an existing one.
Creating one from scratch is as simple as adding a new directory, accessing it, and initialising it as a Git repository:
$ mkdir myproject
$ cd myproject
$ git init
After running git init, a subdirectory called .git will be created containing all the files necessary to make it a Git repository as such, with files such as configuration files and the object database.
If you want to work on an existing project hosted in an online repository (from GitHub or Bitbucket, to name a few providers), after it has been placed in the repository where you intend to store it, you can clone it with the git clone command:
$ git clone https://gitprovider.com/anuser/arepository.gitWhen cloned, a full copy of the project’s history is downloaded to work with locally, and a connection to the remote version of the repository is established, making it easier to synchronise changes.
Git glossary and basic commands
Git introduces a number of specific terms that are essential to understanding and working effectively with Git. Below, we will review some basic terms and commands listed in the order in which they can be circumscribed to the specific stages of Git change management.
For a broader quick reference, this GitHub Cheat Sheet may be useful as soon as you have some familiarity with version control. In any case, for a complete picture of the different functions and configurations, the official documentation is a must-have reference.
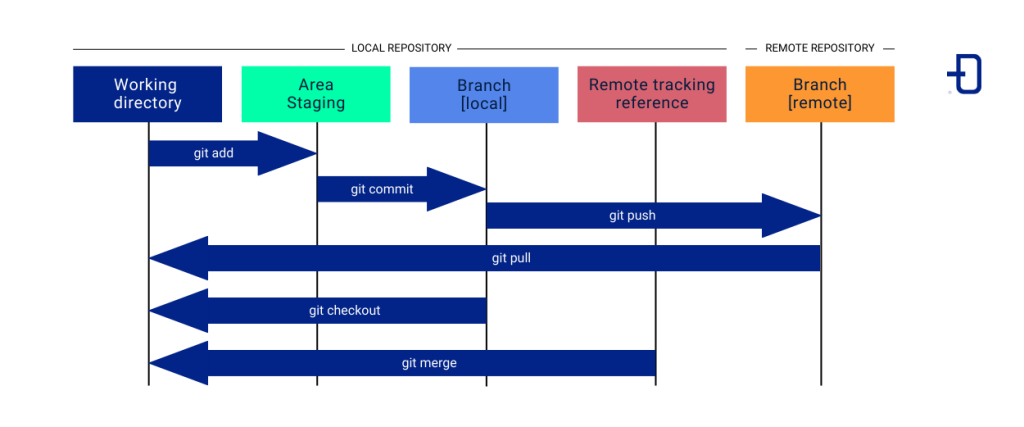
When doing a new development, you are adding or modifying project files located in the working directory. See this process as the first stage of development. The goal here is exclusively to make and review changes to the code before preparing them for inclusion in the project history.
The status command shows the status of the files in the working directory, indicating which ones have been modified, added or are untracked.
$ git statusWhen the new code is complete and reviewed, it is time to select the specific changes to be incorporated into the history. This is called the staging stage and is intended to control which changes are to be committed and which are not. The selected changes will be stored in the staging area.
Using the add command, files are added to the staging area.
$ git add <filename>

# Add all untracked files:
$ git add .
The next phase is the commit stage and its purpose is to maintain a clear and descriptive history of changes to the project, making it easier to track and manage the code.
A commit is a snapshot of changes made to a project at some point in time. Each commit saves a point in the project’s history with a message describing the changes.
$ git commit -m “description of changes“

# Recommended alternative that allows changes to be added at the same time as the message is entered:
$ git commit -am “description of changes“
The log command is used to display the commit history. It is useful for reviewing the history of changes and finding previous versions of the code.
$ git logA branch is an independent line of development. The organisation in branches allows working on different functionalities in isolation, without interfering with each other.
# List, create or delete branches:
$ git branch
Making a branch change is as simple as using the checkout command:
$ git checkout <branch>

# Create a new branch and hover over it:
$ git checkout -b <new branch>
At the synchronisation stage, you want to keep the remote repository up to date with the latest changes developed by the team. A remote repository is a version of the project typically hosted on the Internet.
If you want to remotely host a newly created repository locally, you will need this command:
$ git remote add origin <address_where_it_is_hosted.git>In case you want to establish an effective connection between local and remote, you will need to obtain access tokens from the platform where you want to host it (GitHub, GitLab, etc.). Git will require them as soon as you try to upload changes to the remote repository.
For convenience, it is recommended to configure Git to remember the tokens. There are several ways to do this, with different alternatives depending also on the operating system. On Linux, the simplest (and least secure) involves using $ git config --global credential.helper with the store or cache options to store them on disk or in memory, respectively.
Whether you can use more secure options will also depend on the options offered by the platform on which you want to host the repository. GitHub, for example, allows SSH protocols to be used for authentication.
A push is used to send commits to a branch of the remote repository. This is a must-have feature for sharing changes with other team members.
$ git push origin <branch>The pull command is used to update the local repository with changes from the remote repository. This function is necessary to be able to work with changes made by other team members.
$ git pull origin <branch>In the integration phase, the goal is to combine changes from different developments.
A merge is used to pull changes from a certain branch into the current branch, for example, from the development branch into the main branch.
$ git merge <development branch>
# After placing (with checkout) on the main branch
Subsequently, development enters the review and conflict resolution and testing and validation phases, related to ideas that will be discussed more extensively in the next section. Finally, the release stage involves deploying the software into the production environment.
This process usually includes the creation of tags, used to mark versions of the code (understood as specific points in the commit history).
$ git tag v1.0.0

# Send the tags to the remote repository:
$ git push origin --tags
Best practices with Git
In order to get the most out of Git and keep your projects tidy, it is important to follow some good practices:
- It is recommended to make frequent commits with small, well-focused changes in order to make it easier to track modifications and identify problems.
- Writing clear and descriptive messages will help the rest of the team (including yourself in the future) to understand the purpose of each change.
- A proper branching policy should be followed.
Branching policy
Maintaining a structured branching policy is vital to the success of any software development project. It is important because it helps organise the work and ensures code stability. The following describes a very common branching policy that involves three main branches in addition to the feature branches. Here they are called main, test and develop, but they can be called by other names.
The feature branches are what developers use to keep the develop branch clean and stable. Once a feature branch development is complete and tested locally, the developer creates a pull request (PR) where he receives feedback from other team members. After making any required improvements and revisiting the code, when the other team members approve the development, it is incorporated into the develop branch.
Develop acts as a test environment for the programmers to make sure that all the new features developed work well together.
As for test, it is used for specific tests and reviews. It receives changes from the develop branch and, once they have passed the tests defined as necessary, they are merged into main.
Main is the core branch of the project and should always contain stable code, ready to operate in a production environment. It is used to release new versions of the software. Under no circumstances should code be merged directly into main without being tested and approved by the team. This branch should be protected, even if only formally, so that only those responsible for the project can decide when changes are made to it.
Conclusion
Git is a version control system that has become almost indispensable for anyone involved in software development. In this post, we’ve covered the basics of getting started with Git from scratch, with a theoretical review of its place in the CI/CD process, the abstractions it employs and its most important commands, not to mention the best practices that should be followed to ensure that collaborative projects stay organised.
While it can be intimidating at first, there is little difficulty in mastering the basic functionality of Git. As with any other technology, getting a handle on its less commonly used commands requires exploring its official documentation.
So that’s it! If you found this article interesting, we encourage you to visit the Software category to see other related posts. See you soon!
