In the world of application development, container-based deployment environments are becoming more and more common. Kubernetes has established itself as the standard for container-based deployment. However, for many developers, setting up and managing a complete Kubernetes cluster can be a complex task, especially when we only need a local development environment. But don’t worry, Minikube is here to help!
What is Minikube?
Minikube is an open source tool that allows developers to run a local Kubernetes cluster on their personal machine. It is designed to be a simple and lightweight solution, ideal for testing and developing applications on Kubernetes without the need to deploy a full cluster in the cloud or on multiple servers.
Internal architecture of Minikube
Minikube helps us to simulate a Kubernetes cluster locally, so let’s see what components a cluster has in broad strokes.
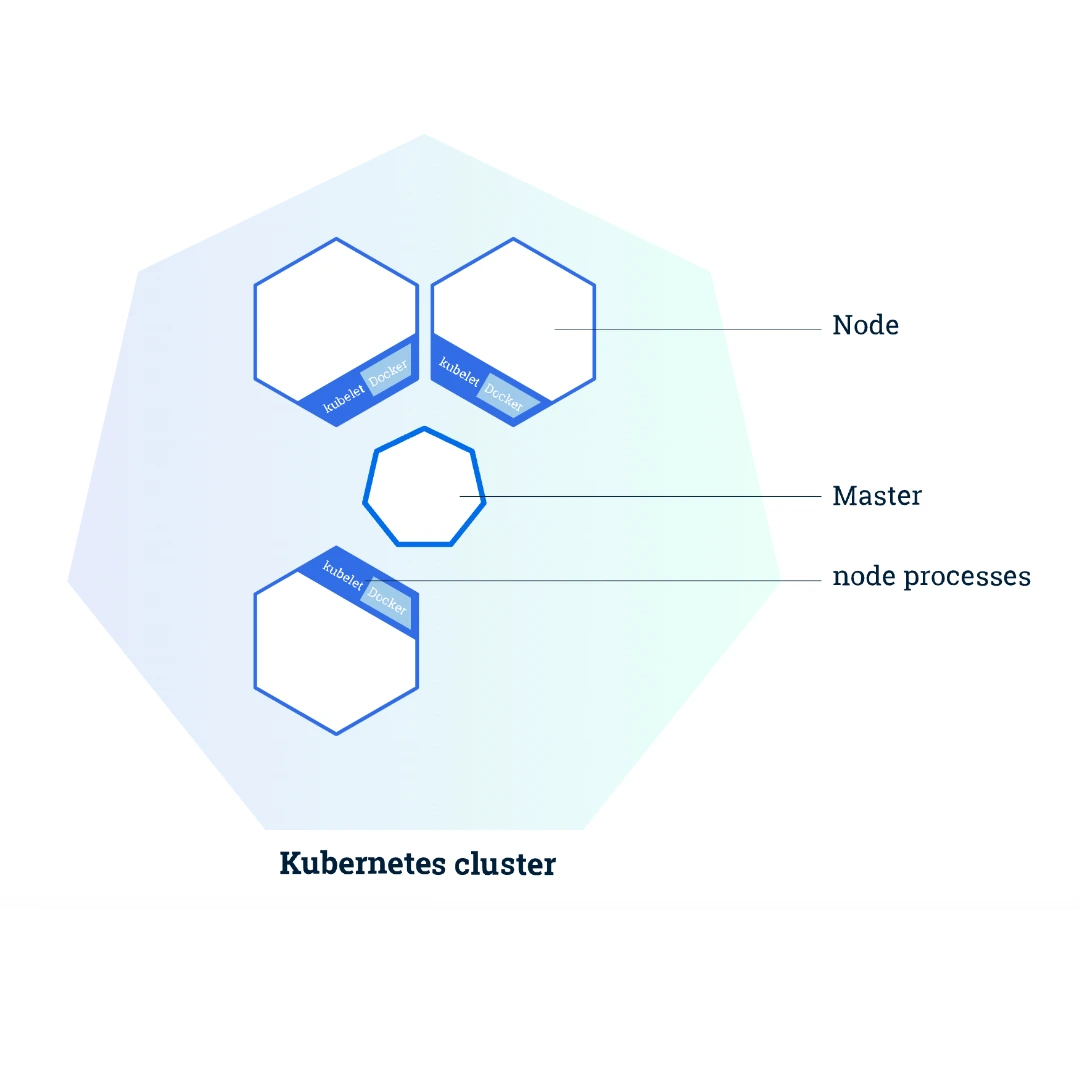
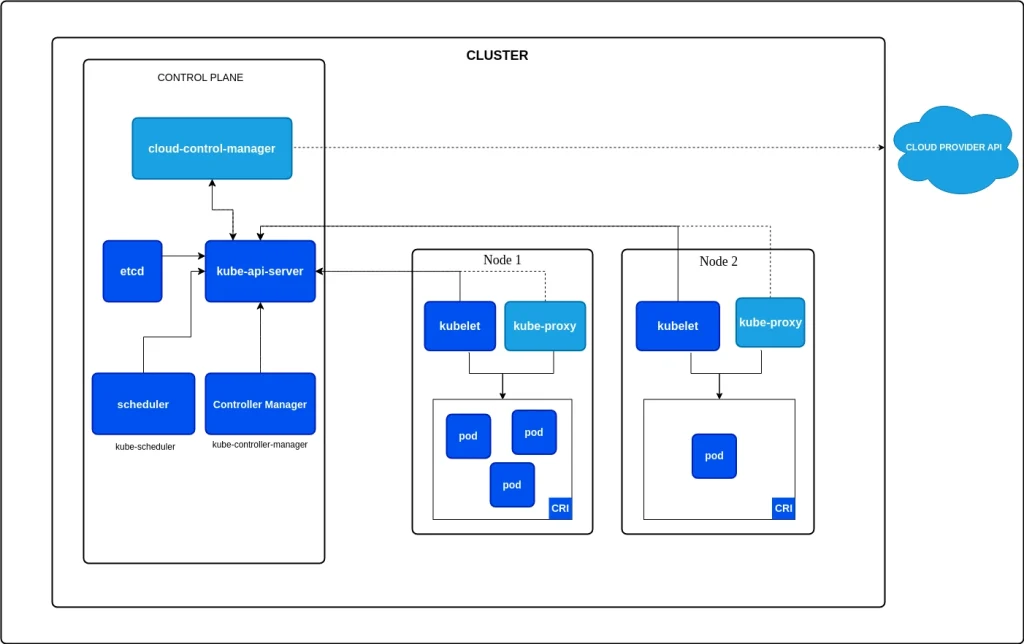
A Kubernetes cluster is composed of two main pieces: the Control Plane and the Nodes, in a Hub and Spoke architecture. The Control Plane acts as the Hub and the Nodes communicate with it to do their work.
The Control Plane is responsible for coordinating all cluster activities, as well as orchestrating, scheduling and maintaining the state of the applications running on it. This includes, of course, updating them.
On the other hand, the Node can be a VM or a physical machine that acts as a worker within the cluster. Each node has a Kubelet agent that is in charge of communicating with the Control Plane.
How does Minikube work?
Minikube simulates a Kubernetes cluster with a single node. It does this by creating a VM on a hypervisor such as VirtualBox, VMware, Hyper-V, etc., or by creating a container on the host machine that allows it to simulate this VM.
This open source tool uses drivers to communicate with the container or VM generated. In this page you can find the supported Minikube drivers depending on the operating system.
Installing Minikube locally
Before deploying Minikube, we must have at least one of these virtualisation or container systems to be able to launch it. In my case, I am using only Docker on an Ubuntu operating system.
We launch the command minikube start —kubernetes-version=v1.15.0
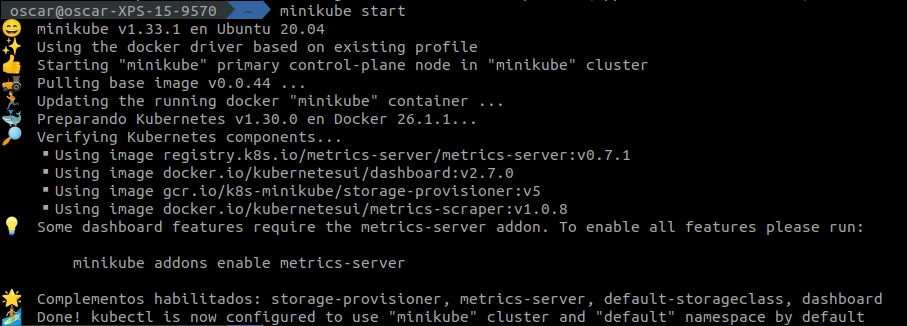
Minikube allows a lot of configuration in the way it starts up. In this case, booting without arguments we see that it is using the default “docker” driver. This can be changed using any hypervisor, but in this case, we will use the Docker one.
On the other hand, we can see that when we start Minikube, a series of addons are also activated, which we will introduce later in this post.
Most commonly used commands
When we want to initialise a Kubernetes cluster locally, a main aspect of the configuration that we want to have under control is the size of the cluster, and Minikube makes it easy for us to define it.
minikube start --memory 7200 --cpus 6 --disk-size=30gIn this way, we can configure its size, which we must remember only has one node.
We can also configure the drivers with which we are going to launch our cluster virtualisation:
minikube start –driver=dockerIt’s also possible to run the cluster using the maximum available system resources:
minikube start --memory=max —cpus=maxWe can launch a cluster on a specific version of Kubernetes and also run multiple clusters on a single machine. To do this, we must make use of what is known as a profile.
To see the list of existing clusters on the machine, we can run:
minikube profile listAnd to execute a new profile, we launch:
minikube start –profile=my-profile —kubernetes-version=v1.20.0We will always have an active profile, but we can switch from one to another in the following way:
minikube profile my-profileA common use case is to contact the Kubernetes cluster from outside. It is possible to configure Minikube to listen on a remote network. However, it should be remembered that Minikube is intended for local development, so it is strongly discouraged to have this type of practice in a production environment due to its security implications.
minikube start --listen-address=0.0.0.0Minikube addons and how to activate them
Once we have our cluster active, we can enable a series of addons that help us to extend the functionality of Minikube.
minikube addons listThese addons will allow us, for example, to enable the use of the web interface for the administration of our Kubernetes cluster. If for some reason the dashboard plugin is disabled, we will enable it with the following command:
minikube addons enable dashboard

minikube dashboard
In the logs screen we will see a URL that we can use to access all the administration of our cluster. We can see all the logs of the type of resource we want, all the namespaces, operate with the resources by deleting them, and even export the YAML definition of them. In addition, we can start a terminal session inside a pod to browse the image.
Most popular addons
Next, we will see some of the addons that I have personally put into practice the most.
Metrics-server: This addon allows us to see the metrics of our cluster. This metrics system is absolutely necessary if you want to use the horizontal autoscaling system (HPA).
To enable it, we will use:
minikube addons enable metrics-serverWe will now be able to see the metrics of a pod, for example:
kubectl top pods
Metrics Server collects metrics from Kubelet resources and exposes them through an API. This service is designed to allow us to work with and validate our auto-scaling policies, but it is not intended to be used as a full monitoring tool.
Ingress is another must-have addon, especially when we want to connect our services or microservices with other external components, such as external queries. This addon deploys an NGINX driver that manages HTTP and HTTPS access to services within the cluster. With Ingress, we can configure our own routing routes, load balancing and SSL security policies.
Finally, I would like to highlight another addon called Registry, which allows us to set up a completely private Docker Registry service that we can manage ourselves. This registry service can be used to deploy our private images in Kubernetes. We can upload images, store them and then download them to our Kubernetes cluster as needed.
Image loading in the cluster
In our local application development pipelines, we will encounter many situations where we want to load a previously compiled image into the local Kubernetes cluster. When we run docker build for an image, it is registered in our local image system, which of course is not accessible from outside or from our cluster.
Minikube provides us with a command to load images into the cluster.
minikube image load <image>If we want to see which images have been uploaded and will be accessible from our cluster, we can use:
minikube image lsThere is also the option of using the private registry of the addon mentioned above.
Conclusion
Minikube has become an essential tool for developers and system administrators like myself who need to develop container-oriented applications in a local Kubernetes environment. Its ease of use, coupled with the ability to simulate a small-scale production environment, makes it an ideal choice for a variety of use cases.
However, it is important to note that it is not a tool intended for production environments, so limit its use to development and testing purposes.
That’s all there is to it! If you found this article interesting, we encourage you to visit the Data Engineering category to see all the related posts and to share it on networks. See you soon!
