Among all the tools we can access in Google Cloud, one of the most powerful and widely used is undoubtedly BigQuery. Its versatility as a DWH (Data Warehouse) has positioned it as one of the main cloud solutions for data analytics. When implementing this type of data storage solutions that can be accessed by a multitude of users or departments in the organisation, one of the problems that arises is ‘who sees what’ and even ‘how they see it’.
This privacy management can be approached in different ways. Depending on our needs, different decisions can be made. Sometimes, a simple authorised view will be enough, or limiting permissions to certain datasets or tables for a set of people who need that data. But in other cases, and from a data governance point of view, this can end up increasing the size in a way that ends up being extremely complex and difficult to manage, maintain and scale.
Within the services associated with the GCP data catalog API, we have a convenient, fast and easily scalable option for data control, access control at column level. This tag-based mechanism allows us to easily control at different levels of granularity who can see which columns, or even how to see them (data masking).This also allows us to add an extra layer of information and metadata to our tables.In this post, we will see how to carry out this process as well as a practical use case.
Protection of sensitive data
First of all, it will be necessary that our project has the APIs required for this task. In this case, Google Cloud Data Catalog API and BigQuery Data Policy API must be used. It is also required that the user in charge of performing the tasks presented below, has certain roles. These roles are the Policy Tag Admin role, the BigQuery Admin role or the BigQuery Data Owner role and the Organisation Viewer role. Additional roles may be necessary and will be assigned during the process itself.
Once we have our working environment with everything we need, the tagging and permissions management process begins.
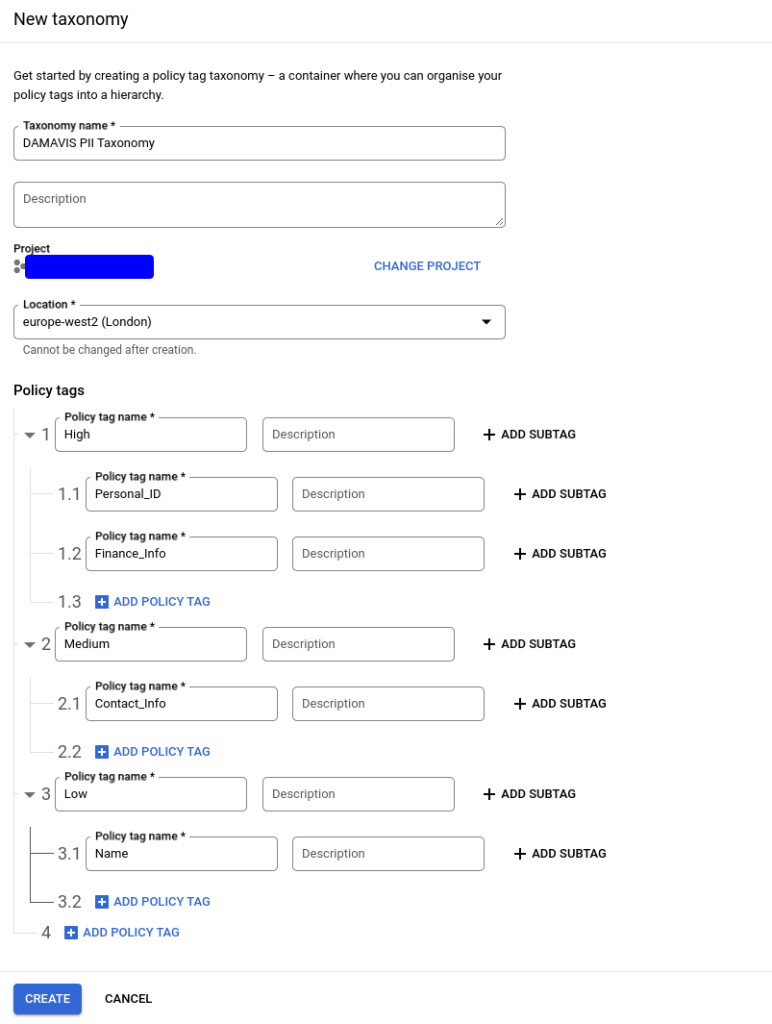
The first thing to do is to analyse our use case and generate an appropriate taxonomy that fits our requirements. To do this, we will go to the Policy Tags section in BigQuery and there we will create our Taxonomy.

A good practice to follow is to group the different labels that require a similar access policy under a higher level. In this case, we can see as an example how we have created a taxonomy where we divide all the information into 3 levels of ‘privacy’: highly sensitive data, medium level or low level. Depending on the desired granularity and the information we want to add in our columns, we can opt for more or less levels of complexity. These policies can be updated in a simple way. If in the future we require new levels or new subtags, we can add them without any problem.
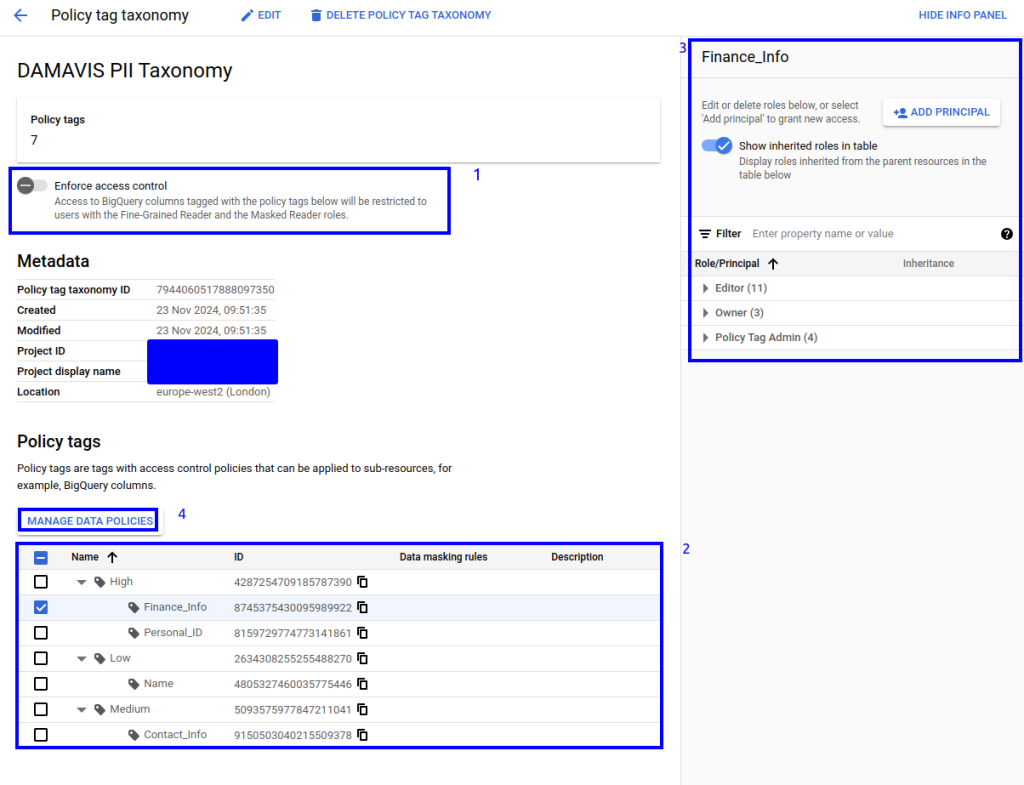
After creating the taxonomy, we will have access to the panel that will allow us to assign the specific policies that will be applied. There are several sections in this panel:
- Activation of access control. This interactive button will allow, once the policies have been configured, that only the users assigned to view the tagged data can access them. This implies that the policies created take effect.
- Tag tree. We will have the representation of the created tags, allowing us to select each one of them to add roles that will have visibility over the tagged data.
- Information panel. On the selected tags, we will be able to observe both the inherited roles and include the new ones that apply to these tags.
- Data policy management button. We will be able to access a menu, again on the selected tags, where to apply a masking policy on the data.
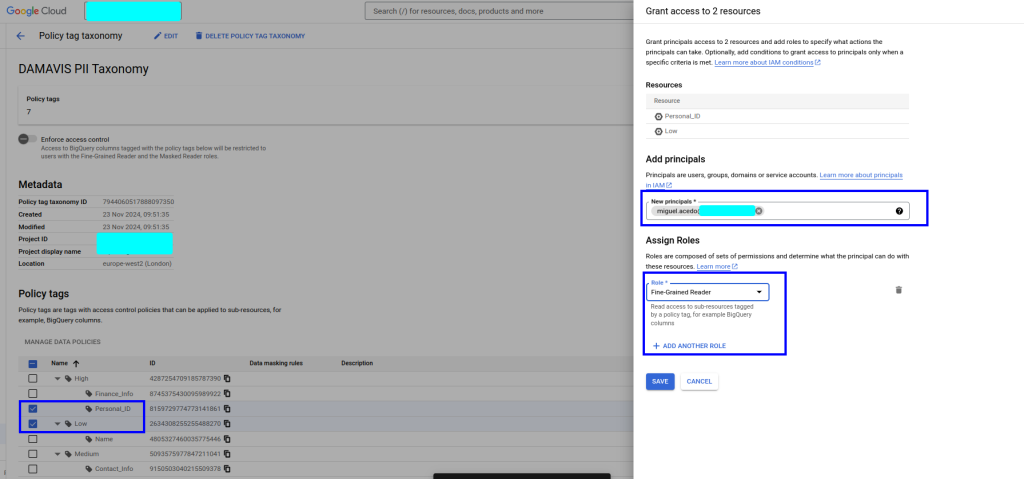
Then, using the UI, we will proceed to assign each of these resources to the groups, users or service accounts we want. In this case, we will apply the following:
- We are going to give permissions to our user with the role fine grained reader for certain columns, everything corresponding to the low privilege tagging and for one of the tags that has highly sensitive information. The rest of the columns, if they have any tags assigned to them, will not be visible to this test user. As we can see, we have chosen both a specific tag and a complete ‘branch’.
- Secondly, for the contact_info tag, which we will use to tag the email, we will apply a special masking. Within the configuration of this filter, we must again indicate which user/role will be assigned the maskedReader permission and will therefore be able to see the column but with its information obfuscated.
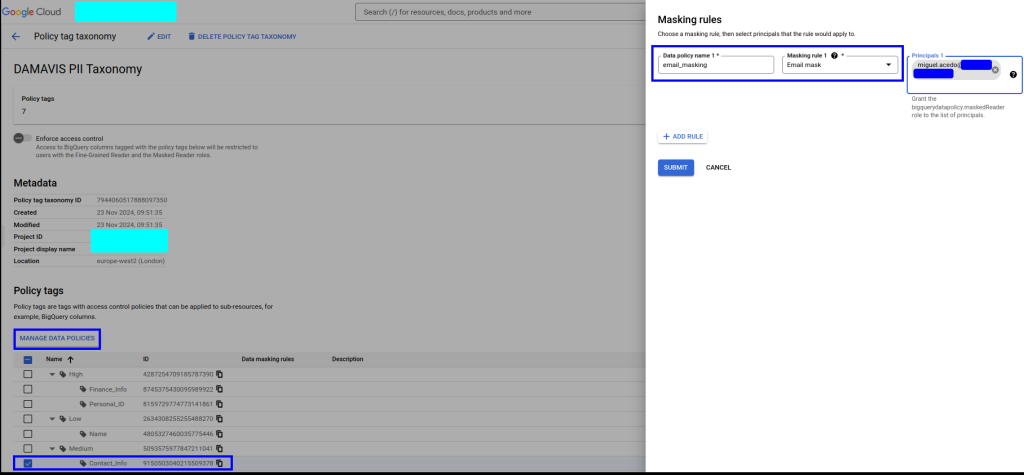
Depending on our needs and the type of data, it is possible to set one rule or another. For example, we can apply null to the whole field, a default value, a particular rule like the one we apply here, a hashing or even a UDF on the field.
In this last case, the functions will be created as routines in BigQuery, having as particularity the flag data_governance_type = ‘DATA_MASKING’, which will allow us to select this routine inside the interface.


It is important to clarify that, once the policy is activated, all columns containing any of the labels present in the policy will disappear for those roles to which it is not explicitly stated that they have access. Therefore, in order to avoid problems in our processes, it will be very important to make sure that this data is not currently being used by other roles or service accounts.
Practical example
As an example, a table has been created with information regarding a possible use case, in which we have employee information that we may want to access in a controlled way.
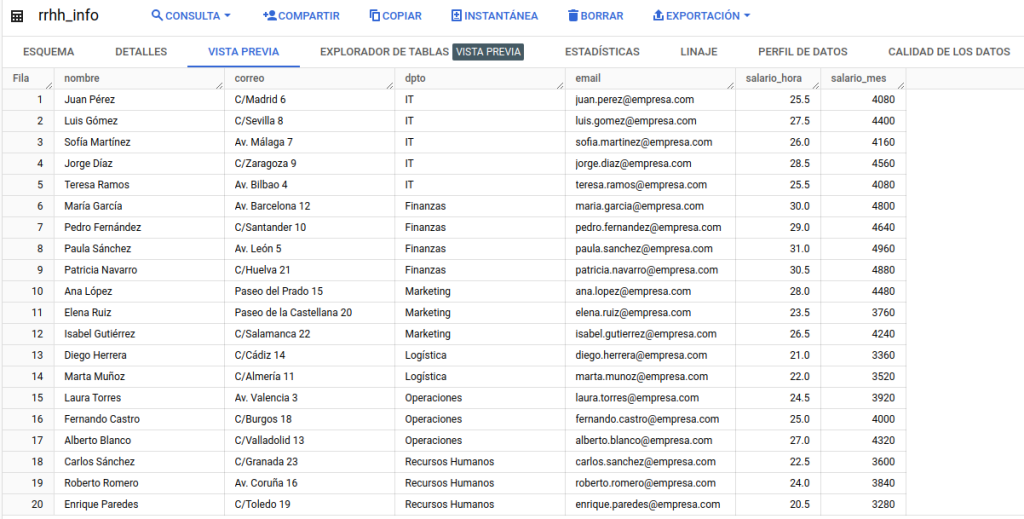
We will then apply labelling to the columns as appropriate by editing the schema.
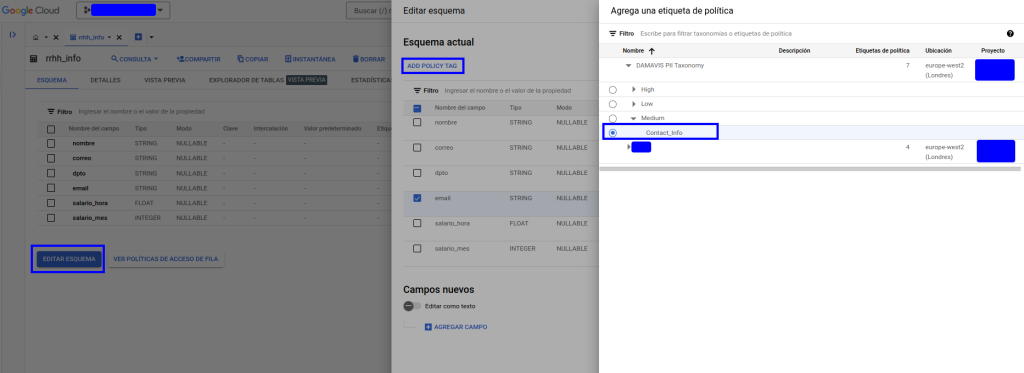
Once the desired labelling has been applied, we can see in the schematic that the information has been added in the corresponding column:

This assignment of a tag for each column can be done in different ways. Either from the interface, as we have just seen, or as an extra option in the table schema. This schema can be included in the creation, or by updating it from the bigQuery api or from the CLI. Where it cannot be included is through DDL statements in the BQ interface. In the schema, we will add the policyTags option and also the path to the policy:

[
 ...
 {
   "name": "email",
   "type": "STRING",
   "mode": "NULLABLE",
   "policyTags": {
 	"names": ["projects/project_id/locations/europe-west2/taxonomies/7944060517888097350/policyTags/9150503040215509378"]
   }
 },
 ...
]
After the process is complete, we will be able to activate our new policy and see that we do indeed have access to the data as we have configured it. Our user will have access to:
- All the columns that are not labelled and that, therefore, will be governed by the permissions already acquired on the project.
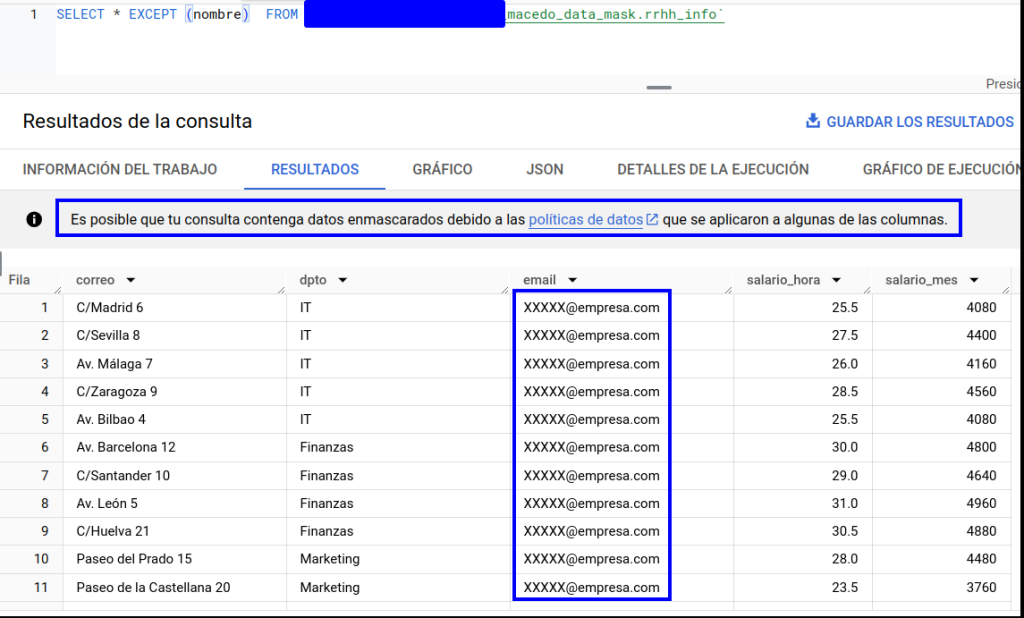
- Visibility of the email column, but in an obfuscated form.
- Within the labelled columns corresponding to highly sensitive data, we will only have access to those related to the salary, not being able to see the one linked to the Personal_ID policy.
In the following images we can see how these changes have taken effect:

If we try to query the table:

We will have to exclude the column in question if we want to access the data. This factor must also be taken into account when analysing which processes make use of SELECT * statements. Otherwise, these processes may fail.
As an example, another member of the team (who only has the project’s own accesses) has been asked to try to access the resource:


We can see that, both in the schema and in the preview, BigQuery indicates and limits its access level.
Conclusion
As we have seen in the post, the first time we generate these policies can be a painstaking job. Moreover, it is something that requires some manual intervention (especially if this methodology has not been implemented since the generation of the project). Its scalability and easy maintenance are, without a doubt, the strong points to take into account when looking for a solution that allows us to control access to our data.
The application of these tags to all the tables we create, or the inclusion of new users/service accounts to groups present in these policies, will allow us to have granular control over all the information in our project without having to make changes to views, datasets or tables manually. Separating, therefore, data governance from ETL processes or the analytical part of our organisation.
If you found this article interesting, we encourage you to visit the Data Engineering category to see other posts similar to this one and to share it on networks. See you soon!

