In a previous article, we analysed what is end-to-end testing, its scope, types, best practices, vulnerabilities, security risks and some interesting technologies.
This time, we are going to work with SeleniumBase, a Python testing framework based on Selenium. First we will define what it is, its main features and then we will see how to install it in our work environment and perform a couple of simple tests.
What is SeleniumBase?
SeleniumBase is designed to make it easier to write, run and maintain automated web application tests. It is a wrapper that simplifies common Selenium tasks by adding additional features that make it easier to use and more efficient. It is ideal for developers and testers looking for a more intuitive and accessible approach to E2E testing.
Using Selenium WebDriver or ‘pure Selenium’ when automating browser testing provides very advanced control. Almost everything can be configured manually (timeouts, exception handling, etc.) and it is also compatible with many programming languages. However, the code is often long and complex, making it difficult to configure and maintain.
When implementing many of Selenium’s functionalities, it is necessary to download plugins. Therefore, using SeleniumBase is much faster when it comes to using an E2E testing technology and getting it up and running. On the other hand, it has many of the plugins built directly into its core, many of which you will probably need to download if you decide to use pure Selenium. It is also capable of performing such tests in fewer lines of code.
Key features of SeleniumBase
Among its key features, the following stand out:
- Offers a simple API with short, easy-to-read methods.
- Is capable of performing waits automatically, natively.
- It can save individual images with specific failures of the tests it executes.
- It logs HTML reports with information about each test (status summary, screenshots, execution details and performance graphs).
- You can run tests in parallel with pytest.
- It is compatible with other Python testing frameworks (such as pytest and unittest). This allows you to create more robust tests with wider coverage.
- It allows you to run tests without opening the browser.
With these features, you can see the potential that SeleniumBase has. However, we must take into account that, in case we need to prioritise control and flexibility in the configuration of the tests or the use of languages other than Python due to the needs of the project or the team, we should use pure Selenium.
Most common SeleniumBase functions
SeleniumBase has a wide range of functions available to meet all our needs. However, perhaps most of the time, the ones we will use are the following:
For navigation
- self.open(‘my_application_path’): opens a path.
- self.go_back() / self.go_forward(): navigates forward or backward in the browser.
- self.refresh_page(): refreshes the current page.
- self.get_current_url(): gets a url of the open page.
To interact
- self.type(‘input#username’, ‘employer_one’): Type text into an input field. Essential for forms or search bars.
- self.click(‘div.class’) / self.double_click(‘div#id’): left click once/twice.
- self.right_click(‘a#id’): right click on the element.
To check elements
- self.assert_element(‘div#id’) / self.text(‘My title’, ‘div#id’): verifies that a specific element/text exists.
- self.is_element_visible(‘div#id’) / self.is_text_visible(‘Hello’): returns true if the element/text is visible on the page or false if it is not. Sometimes, although we see the element/text in the HTML of the document, it may not be visible on the page and we need it to be.
For timeouts
- self.wait_for_element(‘div#id’)/self.wait_for_text(‘Hello’, ‘div.class’): waits for an element/text to appear on the page.
- self.sleep(3): waits for the time you specify, measured in seconds.
Other methods
- self.hightlight(‘div.class’): highlights a page element and is useful for debugging.
- self.download_file(‘https://somewhere.com/data.zip’): download a file.
- self.scroll_to(‘a.class’): scroll to an object.
As can be seen in the examples, both div#id (ids are referenced with ‘#’) and div.class (classes are referenced with ‘.’) can be used. Ideally, the use of ids is recommended, as they uniquely identify the element in question in the HTML.
However, sometimes some elements in our websites do not have one. In these cases, we must reference the element using classes, following a chain of inheritance between classes until our test is able to find the element we are looking for. This can become more difficult as the frontend of our website has more elements laid out with the same structure, as it is common for the test to be looking at the wrong element. In these situations, it can be more difficult to locate the element in the HTML.
SeleniumBase installation and environment configuration
At this point, we are going to prepare our environment for E2E testing with SeleniumBase. To do this, I recommend that we install a recent version of Python. In my case, I will use Linux and install Python 3.11. I always recommend using environments to install all the libraries and their dependencies, so that we don’t generate problems between the dependencies of our libraries between projects.
sudo apt updatesudo apt install python3.11python3 --version(should return version 3.11)python3 -m venv .envsource .venv/bin/activate(to activate the environment)
If you don’t use Linux, just skip 1 and 2 and look up how to install Python on your system. After that, you can install it inside your virtual environment through the console of your IDE using pip or pip3.
From this point on, we must make sure that everything is installed inside our virtual environment. Next, to install SeleniumBase, we must execute the following two commands:
pip3 install seleniumbasepip3 install pytest-html==4.0.2(pytest plugin to generate HTML reports and access their details)
Now, you can clone my repository to install dependencies that you might find useful to get the project running in your local environment, without spending too much time looking for some necessary libraries.
(HTTPS) git clone https://github.com/vanprafer/SeleniumBase.git / (SSH) git clone git@github.com:vanprafer/SeleniumBase.gitpip3 install -r requirements.txt
At this point, we should have the environment ready to create our tests.
First steps
In this section, we are going to run a couple of simple example tests to get started with the tool. To do this, we must go to the test_google.py file of the project that we downloaded from GitHub in the previous step.
In the first function, the first thing we see is the @pytest.mark.dependency decorator, where we are going to indicate the name of the test and if it has any dependency with another test. In this one, as it is the first one, it doesn’t have any.
Also, we must take into account that pytest launches the tests in alphanumeric order, so we indicate the number ‘1’ to the function to be launched first. This makes sense if we have several functions in the same class and it is advisable to do the same with the name of the .py files. With respect to the function code, we can see that we just open a maximised browser tab with the Google path and then close the cookies.
@pytest.mark.dependency(name="google_main_page")
def test_1_google_main_page_browser(self):
   # Maximise tab
   self.driver.maximize_window()
   # Navigate to google
   self.open("https://www.google.com/")
   # Reject cookies
   self.click("div.QS5gu.sy4vM")
To launch it, type the following command in the console to see the result of the test in the browser:

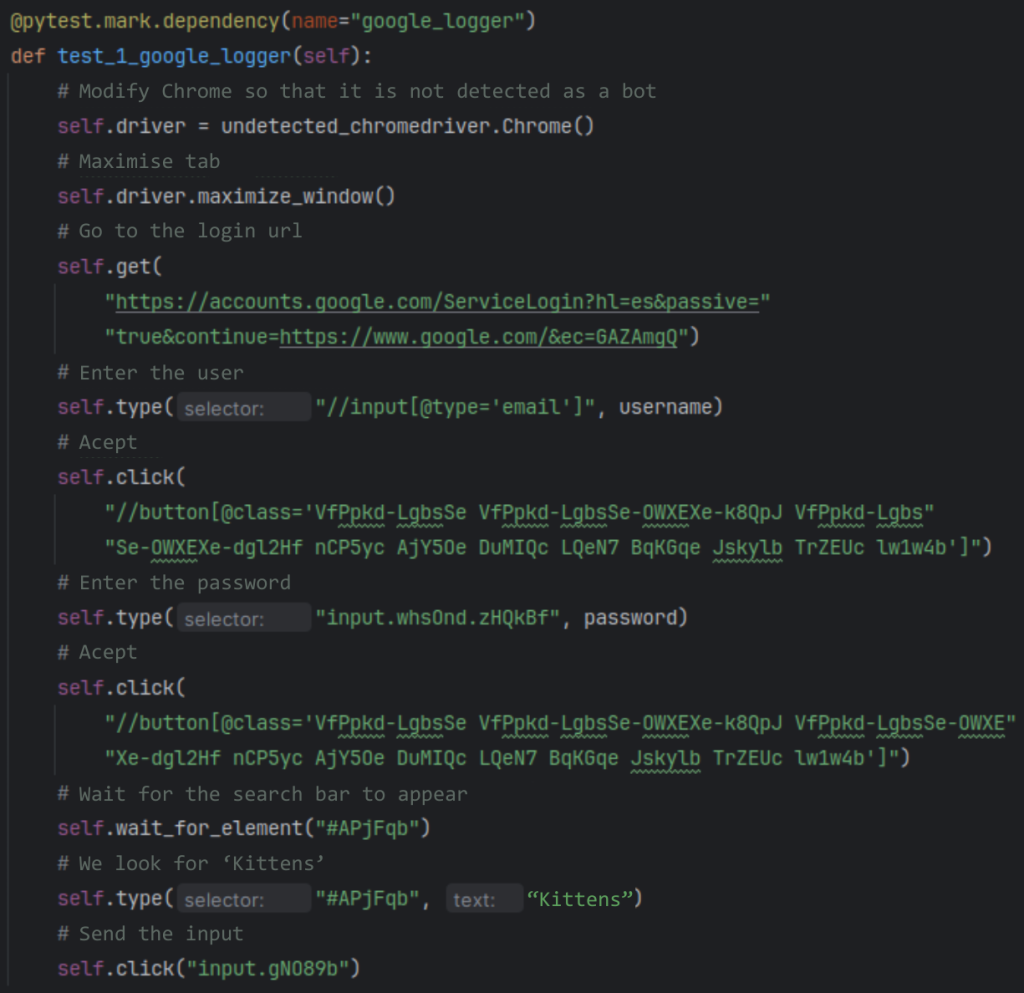
For the second test we are going to perform, it will be necessary to install and import undetected_chromedriver. This library allows you to log in to your Google account, so that the execution of the program with SeleniumBase is not detected as a bot action. Afterwards, we click on the text where it says ‘Sign in’ and a registration form opens. Here we enter our credentials and, finally, we perform a simple search, for example, for the term ‘Kittens’.
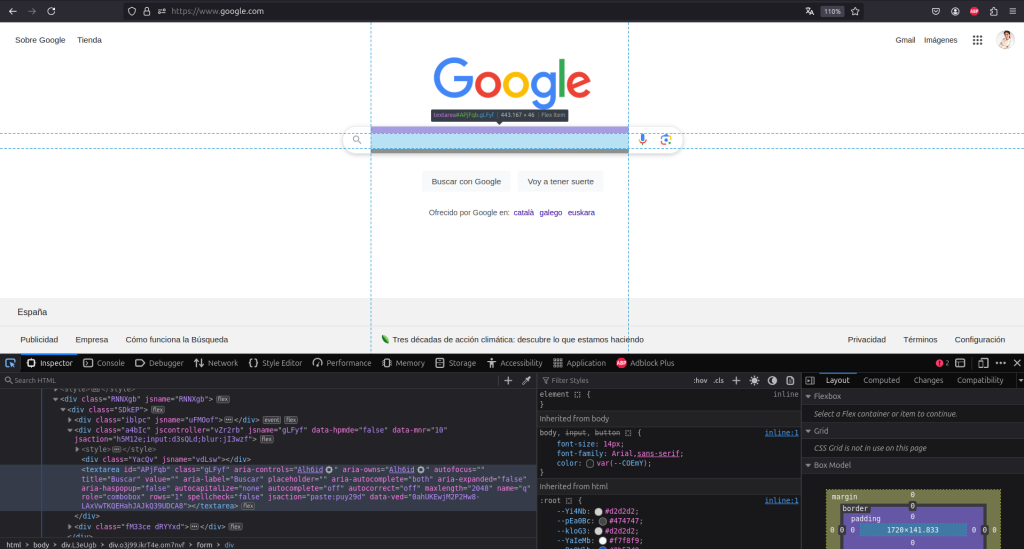
So far, we have seen that we can perform an E2E test to a web site, using a series of SeleniumBase functions. But, where do I get the HTML information that I introduce in my functions? We open the inspector (right click + ‘Inspect’), select the first icon in the toolbar (‘Click an element from the page’) and look for the element in question.
In this case, I recommend using XPath to locate the element efficiently. You can find Use Cases of XPath Python In Selenium With Examples if you need help with the implementation or if it is of interest to you.
Conclusion
In this space, we have discussed a technology for setting up quick and easy E2E tests: SeleniumBase. We have previously stopped to determine its key points and most recurrent functions and, finally, we have installed it and performed a couple of simple tests.
This tool, as they say, ‘can be learned in an afternoon’. I encourage you to put it into practice and test your website with it so that you realise how much time you can save and you can create automated tests quickly, effortlessly and with the peace of mind that your website is working properly.
If you found this post interesting, we encourage you to visit the Software category to see similar articles and to share it in networks with your contacts. See you soon!
